Polaris® Low-Distortion Kinematic Mirror Mounts for Ø1" Optics
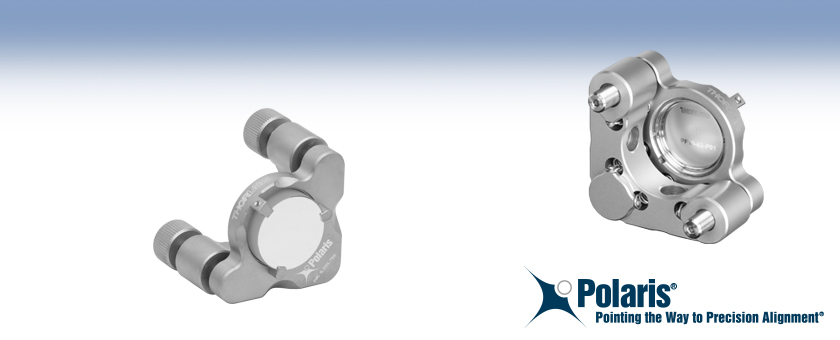
- Matched Actuator/Body Pairs Minimize Drift and Backlash
- Heat Treating Minimizes Temperature-Dependent Hysteresis
- Face Mount Reduces Distortion of the Optic
- Sapphire Seats Ensure Long-Term Stability
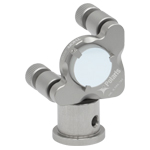
POLARIS-K1F2
Ø1" Mirror Mount
2 Hex Adjusters
(Mirror Not Included)
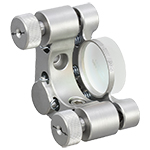
POLARIS-K1F1
Ø1" Mirror Mount
2 Adjusters
(Mirror Not Included)
US Patent 9,599,786

Please Wait
Click to Enlarge
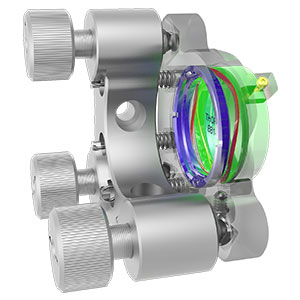
POLARIS-K1F Ø1" Mount Cutaway Diagram

Click to Enlarge
Spring with Indexing Tab
Features
- Machined from Stress-Relieved Stainless Steel with Matched Coefficients of Thermal Expansion (CTE)
- Spring-Loaded, Indexed, Three-Point-Contact Plate Secures Optic
- Hardened Stainless Steel Ball Contacts with Sapphire Seats for Durability and Smooth Movement
- Matched Actuator/Body Pairs Provide Smooth Kinematic Adjustment
- Extensive Testing Guarantees Less than 1 µrad Deviation after Temperature Cycling (See Thermal Test Data Tab for Details)
- Passivated Stainless Steel Surface Ideal for Vacuum and High-Power Laser Cavity Applications
- Custom Mount Configurations are Available by Contacting Tech Support
The Polaris® Low-Distortion Kinematic Mirror Mounts (US Patent 9,599,786) provide long-term pointing stability while minimizing optic surface distortion introduced by the mount. The mount featured on this page is designed for Ø1" optics; other sizes of Polaris low-distortion mounts available from stock are listed in the table to the lower right.
Optic Retention
Each mount features a three-point-contact faceplate to mount the optic to reduce optical distortion compared to standard setscrew or retaining ring optic mount designs. An indexed retention spring between the optic and retaining ring eliminates bending moments on the optic and ensures the force on the optic remains constant over large temperature changes. See the Low Distortion tab and the Optic Installation tab for more details.
| Accessory Quick Links |
|---|
| Large Adjustment Knobs |
| Removable Knobs |
| 5/64" Hex Key Adjusters |
| Side Hole Adjustment Tool |
| Adjuster Lock Nut |
| Adjuster Locking Collar |
| Torque Wrench |
Polaris optic bores are precision machined to achieve a fit that will provide optimum beam pointing stability performance over changing environmental conditions such as temperature changes, transportation shock, and vibration. Each mount is designed to be used with a Ø1" optic that is within +0/-0.005" of the specified diameter; using an optic outside of this range will lead to diminished performance. For inquiries about mounts for other optic sizes, please contact Tech Support.
Design
Machined from heat-treated stainless steel, Polaris mounts utilize precision-matched adjusters with ball contacts and sapphire seats to provide smooth kinematic adjustment. As shown on the Thermal Test Data tab, these mounts have undergone extensive testing to ensure high-quality performance. The Polaris design addresses all of the common causes of beam misalignment; please refer to the Design Features tab for detailed information.
Post Mounting
These Polaris mirror mounts are equipped with #8 (M4) counterbores for post mounting. The Ø2 mm alignment pin holes around the mounting counterbore allow for precision alignments when paired with our posts for Polaris mirror mounts. See the Usage Tips tab for more recommendations about mounting configurations.
Cleanroom and Vacuum Compatibility
All Polaris mounts, retaining rings, lock nuts, and locking collars sold on this page are designed to be compatible with cleanroom and vacuum applications. See the Specs tab and the Design Features tab for more information.
| Item # | POLARIS-K1F | POLARIS-K1F1 | POLARIS-K1F2 |
|---|---|---|---|
| Optic Sizea | Ø1" | ||
| Optic Thickness | 0.15" (4 mm) Min 0.32" (8 mm) Maxb |
||
| Transmissive Clear Aperture | Ø0.83" (Ø21.0 mm)b | ||
| Number of Adjusters | Three | Two | Two |
| Adjuster Drive | Removable Knobs | Removable Knobs | 5/64" (2 mm) Hex |
| Adjuster Pitch | 100 TPI Matched Actuator/Body Pairs |
||
| Measured Point-to-Point Mechanical Resolution per Adjuster |
5 µrad (Typical); 2 µrad (Achievable) | ||
| Measured Adjuster Lock Mechanical Resolution per Adjusterc |
5 µrad (Typical); 2 µrad (Achievable) | ||
| Resolutiond | ~7.7 mrad/rev | ||
| Front Plate Translation (Max) | 6 mm | N/A | |
| Mechanical Angular Range (Nominal) | ±4° | ||
| Beam Deviation After Thermal Cycling | <1 µrade | ||
| Recommended Turns Backf | 1.25 | ||
| Mountingg | Two #8 (M4) Counterbores | ||
| Alignment Pin Holesh | Two at Each Counterbore | ||
| Vacuum Compatibilityi | 10-9 Torr at 25 °C with Proper Bake Out; 10-5 Torr at 25 °C without Bake Out Grease Vapor Pressure: 10-13 Torr at 20 °C ,10-5 Torr at 200 °C Epoxy Meets Low Outgassing Standards NASA ASTM E595, Telcordia GR-1221 |
||
| Operating Temperature Range | -30 to 200 °C | ||
Installing an Optic into a Polaris® Ø1" Low-Distortion Mount
Ensure that there is no grease, dirt, or dust in the optic bore or on the optic itself. Remove any particulates with clean compressed air and/or clean with methanol, acetone, or ethanol. The optic, indexed retention spring, and retaining ring are installed from the back of the mount, as shown in the animation below and to the right. Be sure the index tab is in the key way and touching the retaining ring; reversing the retention spring orientation will result in greater distortion of the optic. Gently turn the retaining ring using a spanner wrench, such as Item # SPW602 or SPW606, until the optic makes contact with the three fingers on the faceplate.
Securing an Optic by Turning Back the Retaining Ring
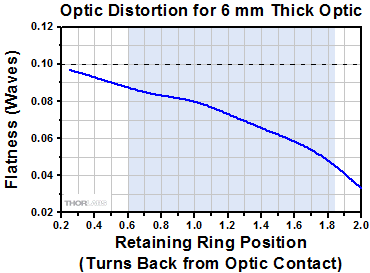
Continue to tighten until the spring is fully compressed into the pocket of the retaining ring. Once the retaining ring makes slight contact with the back of the optic, loosen it by approximately 1.25 turns so that the spring pressure alone holds the optic in place. This will put the appropriate force on the optic, resulting in an additional distortion of a few hundredths of a wave for a mounted optic compared to the optic in its unmounted state, as shown in the graph below.
Securing an Optic with a Torque Driver
Alternatively, the TD24 Torque Driver along with an SPB1 Spanner Bit can be used to apply the appropriate torque to the retaining ring when screwing it into the mount. The torque applied to the retaining ring translates to a force applied to the optic; this mounting process imparts a sufficient mounting force while minimizing the optic distortion. Optics can be secured with a force as low as 4 oz-in; for setups requiring long term stability, a force as high as 24 oz-in can be used while keeping the distortion ≤0.10λ.
While the results when using a torque driver on the smaller mounts can be similar to that of loosening the retaining ring, it can be easy to over- or underestimate the amount of torque needed. This can result in securing the optic in the mount too loosely or too tightly, either of which will have a negative effect on the mount’s performance.
Optic Distortion
The graph below shows the effect of varying the amount of turns of the optic retaining ring on the surface of a 6 mm mirror mounted in a Ø1" Polaris mount. The shaded regions below illustrate the acceptable range of turns back. Minimal turns back should be used for setups that will be exposed to vibrations, while stationary setups may be able to accommodate more turns back. All flatness measurements are taken with a ZYGO interferometer, which uses a 633 nm beam. Please see the Low Distortion tab for more information on optic face distortion as a result of torque.
Optic Installation
To install an optic in a Ø1" Polaris low-distortion mount, tighten the retaining ring until contact is made with the held optic; this will flatten the wave spring. Then back out the retaining ring by approximately 1.25 turns.
Click to Enlarge
The dashed line indicates 0.10λ for reference. Approximately 1.25 turns back from optic contact is recommended for secure mounting with minimal additional distortion caused by the mount. However, this can vary based on the application.
Simulation Results for a POLARIS-K1F Ø1" Low-Distortion Mount
Mounting stresses are responsible for the strain on an optic that results in optic distortion. Minimizing distortion effects is crucial; any distortion to the optic is transmitted to the light that is reflected from it.
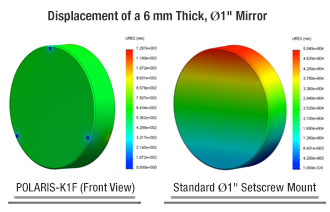
Placing the 3-point mounting forces perpendicular to the face of the optic and indexing them directly opposite each other minimizes bending moments on the optic, thus reducing optic distortion. Typical 360° face mounts and side-located setscrew mounts create bending moments that cause optic distortion as seen in the drawings below. Spring loading the optic allows one to gradually tune the retention force, dampening stresses caused by temperature changes, and it provides a soft means of compensating for variances in manufacturing that can further produce stress on the optic. The finite element analysis results shown below show the displacement, stress, and strain applied to the optic for 20 oz-in of torque applied to the retaining ring of our POLARIS-K1F mount and 10 oz-in of torque applied to the setscrew of the equivalent standard setscrew mount. The POLARIS-K1F1 and POLARIS-K1F2 also have similar designs and therefore will show similar performance to the POLARIS-K1F.
Click for Details
Results of finite element analysis comparing the displacement experienced by a Ø1" mirror installed in a POLARIS-K1F mount with 20 oz⋅in of torque applied to the retaining ring (left) to the same optic installed in an equivalent standard setscrew mount with 10 oz⋅in of torque applied to the setscrew (right). Note: the magnitude of the worst distortion of the Polaris mount is less than the smallest distortion on the standard mount, even though the false color map utilizes the same hue.
Optical Distortion Testing Using a ZYGO Phase-Shifting Interferometer
| POLARIS-K1F Wavefront Distortion Test Results | |
|---|---|
| # of Turns Back the Retaining Ring was Loosened |
Wavefront Distortion (Peak to Valley)a |
| 1/4 Turn | 0.097λ |
| 1/2 Turn | 0.090λ |
| 3/4 Turn | 0.083λ |
| 1 Turn | 0.081λ |
| 1.25 Turns | 0.071λ |
| 1.5 Turns | 0.062λ |
| 1.75 Turns | 0.053λ |
| 2 Turns | 0.033λ |
Procedure
A BB1-E02 Ø1" Broadband Dielectric Mirror was installed into a POLARIS-K1F Low-Distortion Kinematic Mount using the procedure detailed in the Optic Installation tab; that is, the retaining ring was tightened until the spring was fully compressed, and then the retaining ring was loosened incrementally. The mount was then secured to a Ø1" stainless steel post using an 8-32 cap screw tightened to a torque of 16 in-lb. Results of each measurement are provided in the table to the right.
Results
As seen in the image to the right, the wavefront distortion was found to remain at or below 0.1λ.

Click to Enlarge
Retaining Ring Turned Back a 1/4 Turn

Click to Enlarge
Retaining Ring Turned Back a 1/2 Turn

Click to Enlarge
Retaining Ring Turned Back a 3/4 Turn

Click to Enlarge
Retaining Ring Turned Back 1 Turn

Click to Enlarge
Retaining Ring Turned Back 1.25 Turns

Click to Enlarge
Retaining Ring Turned Back 1.5 Turns
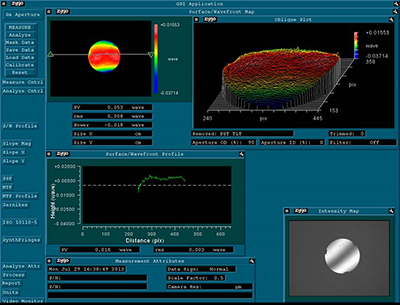
Click to Enlarge
Retaining Ring Turned Back 1.75 Turns
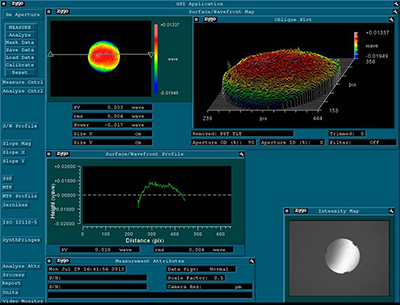
Click to Enlarge
Retaining Ring Turned Back 2 Turns
Positional Repeatability After Thermal Shock
This testing was done to determine how reliably these mounts return a mirror, without hysteresis, to its initial position so that the alignment of the optical system is unaffected by the temperature shock. During the testing phase, these Polaris kinematic mirror mounts were attached to Ø1" stainless steel posts secured to a stainless steel optical breadboard in a temperature-controlled environment. Each mount was secured to the post by an 8-32 cap screw with 16 in-lb of torque. A mirror was mounted (not glued) in each mirror mount, and 8 oz-in of torque was applied to each retaining ring. The beam from an independently temperature-stabilized diode laser was reflected off each mirror’s surface onto a position sensing detector.
Procedure:
Each mirror mount tested was heated, and the elevated temperature was maintained in order to soak the mount at a constant temperature. Then the temperature of the mirror mount was returned to the starting temperature. The results of these tests are shown below.
Results:
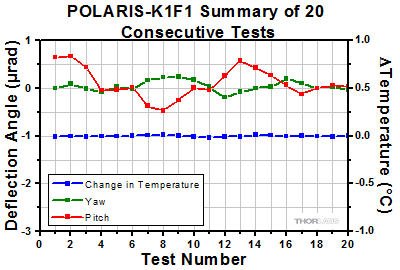
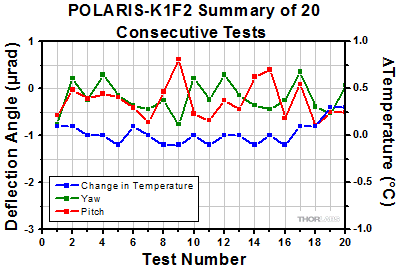
As can be seen in the plots below, when Ø1" Polaris low-distortion mounts were returned to the initial temperature, the angular position (both pitch and yaw) of the mirrors returned to within 1 µrad of the initial position. The performance of the Polaris mounts was tested further by subjecting each mount to repeated temperature change cycles. After each cycle, the mirror’s position reliably returned to within 1 µrad of its initial position.
For Comparison:
To get a 1 µrad change in the mount’s position, the 100 TPI adjuster on the POLARIS-K1F mount needs to be rotated by only 0.05° (1/7200 of a turn). A highly skilled operator might be able to make an adjustment as small as 0.3° (1/1200 of a turn), which corresponds to a 6 µrad change in the mount's position.
Thermal Test Data

Click to Enlarge
3-Adjuster Low-Distortion Mount

Click to Enlarge
The plot above shows the final angular position of the POLARIS-K1F mount for 10 consecutive thermal shock tests. The change in temperature is the difference between the starting temperature and the temperature at the end of the test and includes factors such as the variation in room temperature.

Click to Enlarge
2-Adjuster Low-Distortion Mount
The plots above show the final angular position of the POLARIS-K1F1 and POLARIS-K1F2 mounts for 20 consecutive thermal shock tests. The change in temperature is the difference between the starting temperature and the temperature at the end of the test and includes factors such as the variation in room temperature.

Click to Enlarge
Design Features of the Ø1" Polaris Low Distortion Mounts
Several common factors typically lead to beam misalignment in an optical setup. These include temperature-induced hysteresis of the mirror's position, crosstalk, drift, and backlash. Polaris mirror mounts are designed specifically to minimize these misalignment factors and thus provide extremely stable performance. Hours of extensive research, multiple design efforts using sophisticated design tools such as finite element analysis software, and months of rigorous testing went into choosing the best components to provide an ideal solution for experiments requiring ultra-stable performance from a kinematic mirror mount.
Thermal Hysteresis
The temperature in most labs is not constant due to factors such as air conditioning, the number of people in the room, and the operating states of equipment. Thus, it is necessary that all mounts used in an alignment-sensitive optical setup be designed to minimize any thermally induced alignment effects. Thermal effects can be minimized by choosing materials with a low coefficient of thermal expansion (CTE), like stainless steel. However, even mounts made from a material with a low CTE do not typically return the mirror to its initial position when the initial temperature is restored. All the critical components of the Polaris mirror mounts below are heat treated prior to assembly since this process removes internal stresses that can cause a temperature-dependent hysteresis. As a result, the alignment of the optical system will be restored when the temperature of the mirror mount is returned to the initial temperature.
The method by which the mirror is secured in the mount is another important design factor; these Polaris mounts offer excellent performance without the use of adhesives. Instead, they have a three-point-contact faceplate, an indexed retention spring, and a stainless steel retaining ring that hold the optic in place. This design minimizes distortion on the optic surface while maintaining beam pointing stability.
Crosstalk
Crosstalk is minimized by carefully controlling the dimensional tolerances of the front and back plates of the mount so that the pitch and yaw actuators are orthogonal. In addition, sapphire seats are used at all three contact points. Standard metal-to-metal actuator contact points will wear down over time. The polished sapphire seats of the Polaris mounts, in conjunction with the hardened stainless steel actuator tips, maintain the integrity of the contact surfaces over time.
Drift and Backlash
In order to minimize the positional drift of the mirror mount and backlash, it is necessary to limit the amount of play in the adjuster as well as the amount of lubricant used. When an adjustment is made to the actuator, the lubricant will be squeezed out of some spaces and built up in others. This non-equilibrium distribution of lubricant will slowly relax back into an equilibrium state. However, in doing so, this may cause the position of the front plate of the mount to move. The Polaris mounts use adjusters matched to the body that exceed all industry standards so very little adjuster lubricant is needed. These adjusters have a smooth feel that allows the user to make small, repeatable adjustments.
Cleanroom and Vacuum Compatibility
All Polaris mounts sold on this page are designed to be compatible with cleanroom and vacuum applications. They are chemically cleaned using the Carpenter AAA passivation method to remove sulfur, iron, and contaminants from the surface. After passivation, they are assembled in a clean environment and then double vacuum bagged to eliminate contamination when transported into a cleanroom.

Click to Enlarge
Polaris Mounts are Shipped Inside Two Vacuum Bag Layers
The sapphire contacts are bonded into place using a NASA-approved low outgassing procedure. In addition, DuPont LVP High-Vacuum (Krytox) Grease, an ultra-high vacuum compatible, low outgassing PTFE grease, is applied to the adjusters. These features provide high vacuum compatibility and low outgassing performance. When operating at pressures below 10-5 Torr, we highly recommend using an appropriate bake out procedure prior to installing the mount in order to minimize contamination caused by outgassing. Please note that the 8-32 and M4 cap screws included with the Polaris mounts are not rated for pressures below 10-5 Torr.
Cleanroom-Compatible Packaging
Each vacuum-compatible Polaris mount is packaged within two vacuum bag layers after assembly in a clean environment, as seen in the image to the right. The vacuum-tight fit of the bags stabilizes the mount, limiting translation of the front plate due to shocks during transportation. The tight fit also minimizes rubbing against the bag, preventing the introduction of bag material shavings that would contaminate the clean mount.
In the vacuum-sealing process, moisture-containing air is drawn out of the packaging. This eliminates unwanted reactions on the surface of the mount without the need for desiccant materials. The vacuum bags protect the mount from contamination by air or dust during transport and storage, and the double-vacuum bag configuration allows for a straightforward and effective cleanroom entry procedure. The outer bag can be removed outside of the cleanroom, allowing the contaminant-free inner bag to be placed into a clean container and transferred into the cleanroom while retaining the benefits of vacuum-bag packaging. Inside the cleanroom, the mount can be removed from the inner bag when ready for use.
Click to Enlarge
POLARIS-K1F mount on a Ø1", stainless steel pedestal post.
Polaris kinematic mirror mounts are specifically designed to provide excellent performance under thermal changes and vibrations. Below are some usage tips to ensure that the mount provides optimal performance.
Match Materials
Due to its relatively low coefficient of thermal expansion, stainless steel was chosen as the material from which to fabricate the front and back plates of the Polaris mounts. When mounting, we recommend using components fabricated from the same material, such as our Ø1" stainless steel posts.
Mounting Options
If post mounting a Polaris mount, we recommend using a stainless steel post such as our Ø1" stainless steel posts or Ø1" post extensions with our POLARIS-CA1 Clamping Arm. By choosing components fabricated from the same material as the mount itself, all expansions and contractions will occur at the same rate. In addition, it is best to use the shortest post possible. Alternatively, mount the Polaris directly onto a flat surface such as a breadboard using a 1/4"-20 to 8-32 thread adapter (Item # AE8E25E) or M6 to M4 thread adapter (Item # AE4M6M), which results in even better performance. Ensure that the mounting surface is highly flat, polished, and free of debris or scratches.
To install the POLARIS-LN1 lock nut without cross threading, gently place the lock nut against the end of the adjuster. "Unscrew" the nut until the threads of the nut and the adjuster align before threading the nut onto the adjuster.
Mount Alignment
During alignment, minimized deflection will be achieved if the mount's front plate is kept parallel to the back plate. This ensures even thermal expansion of all the adjustment screws, causing the mounted mirror to translate in the Z direction as opposed to rotating during temperature changes.
Front Plate’s Position
Although the mount is designed to allow adjustments of up to 8°, to achieve the best performance, it is recommended that the front plate be kept as parallel as possible to the back plate. This ensures the highest stability of the adjustments.
Polish and Clean the Points of Contact
We highly recommend that the points of contact between the mount and the post, as well as the post and the table, are clean and free of scratches or defects. For best results, we recommend using a polishing stone to clean the table’s surface and a polishing pad for the top and bottom of the post as well as the bottom of the mount.
Not Recommended
We do not recommend taking the adjusters out of the body, as this can introduce contamination to the threading, which can consequently reduce the fine adjustment performance significantly. Also, do not pull the front plate away as it might stretch the springs beyond their operating range or crack the sapphire seats. Finally, do not over tighten the retaining ring that secures the indexed spring that holds the optic in place; only slight force is required to secure the optic in place. For more information, please see the Low Distortion tab. Do not adjust or remove the spring-loaded ball contact in the faceplate; the correct position is set at the factory.
Adjuster Lock Nuts
Our Ø1" Polaris low-distortion mounts are compatible with the POLARIS-LN1 lock nuts, which are available separately below. The beam can be held on target with the adjuster thumbscrew or hex key while lightly tightening the lock nut by hand or with a thin-head wrench or cone wrench. For applications that require frequent tuning of the adjusters, the lock nuts only need to be lightly tightened by hand to a torque of approximately 4 to 8 oz-in (0.03 to 0.06 N·m). If long term stability is required, the torque wrench sold below can be used to apply the appropriate amount of torque to each lock nut (see the table below for torque values). To avoid cross threading the lock nut, place it against the adjuster and "unscrew" the lock nut until you feel a slight drop; then thread the lock nut onto the adjuster. Each lock nut is pre-greased with the same ultra-high-vacuum-compatible, low-outgassing PTFE grease as the Polaris mounts and has been tested for adjuster fit.
Low Incident Angles
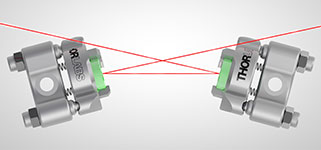
The recessed edge of our Polaris Low-Distortion Mounts make them ideal for applications requiring low angles of incidence. The illustration to the right shows two Polaris Low-Distortion Mounts with Ø1/2" mirrors (green) used at a near-normal incident angle.
| Posted Comments: | |
jdelia
(posted 2024-06-07 09:37:04.0) Thank you for contacting Thorlabs. You are correct that the minimum optic thickness we specify is 4 mm, therefore 3.5 mm would unfortunately not be thick enough for us to recommend using the POLARIS-K1F1 mount. If you require a 1" diameter mount, we unfortunately do not have low-distortion options for a smaller thickness at this time, but I have reached out to you directly to discuss your application and which alternative options may suit your needs. Erik Farr
(posted 2024-04-02 13:57:01.84) In general are the Polaris 1" mount kinematic retaining springs strong enough to withstand being mounted with gravity pulling in the direction to unseat the kinematic interface (e.g. for vertical breadboard or hanging designs)? jdelia
(posted 2024-04-18 12:19:50.0) Thank you for contacting Thorlabs. The springs of these Polaris mounts should not have any issues if you are just mounting an optic in a vertical orientation. I have reached out to you directly to discuss your application further. Balázs Gombkötö
(posted 2022-02-03 04:12:58.423) Why is K25F4/M for 25 mm optics instead of the usual 1" diameter??? jdelia
(posted 2022-02-09 03:41:30.0) Thank you for contacting Thorlabs. We do offer a POLARIS-K1F2, which has very similar performance to the POLARIS-K25F4/M, but does not have the side holes in the adjusters. The reason we have two separate mounts for these optic diameters is because there is a very tight tolerance on accepted optic diameter. The K1F2 has an accepted optic diameter of 1" +0/-0.005" (25.4 mm +0/-0.127 mm) and the K25F4/M is specified at 25 mm +0/-0.15 mm. I have contacted you directly to discuss this further. Joel Blum
(posted 2019-06-12 21:07:11.733) What adhesives are used in the Polaris-K2F3? I would like to put this into a vacuum chamber and need to know what might outgas. I need manufacturer and product name to reference. Thanks. YLohia
(posted 2019-06-13 09:45:26.0) Hello, thank you for contacting Thorlabs. The POLARIS-K2F3 uses DuPont LVP High-Vacuum (Krytox) Grease and EPO-TEK 353ND A/B epoxy. hyosubkim
(posted 2019-02-20 19:10:48.95) Am I able to replace the 'POLARIS-K2F2' tuning knobs to 'POLARIS-P20'? YLohia
(posted 2019-02-21 12:18:17.0) Hello, thank you for contacting Thorlabs. The POLARIS-P20 actuator has 3/8"-100 threads and is not compatible with the POLARIS-K2F2 mount, which incorporates 1/4"-100 adjuster screws. user
(posted 2017-09-21 13:24:48.79) It is not easy to me to put in place the mirror. The mirror has to be "launched" in position from the back side towards the 3-point face mount, but at any minimal mirror tilt, the mirror itself gets stuck.
Any tip to do this operation safely and preventing mirror damage ? (I would not like to push the mirror)
Thanks tfrisch
(posted 2017-09-26 05:26:46.0) Hello, thank you for contacting Thorlabs. We do have an Optic Installation guide, but if you are having trouble with the optic tilting and catching on the threads, the solution will depend on the optic. For a mirror with a ground back surface, you may be able to hold it by the back and guide it in. For an optic where the back surface is an optical surface, you may want to use an optic spacer like SM05S10M to guide it into the seat. user
(posted 2017-09-16 17:00:04.72) Dear Thorlabs,.
I have been you customer since long time... Seriously I would like to ask you a question that "How many Polaris mirror mount needed by users?" I fly through your Polaris selection...there are crazy too many unnecessary polaris mirror mounts in your catalogue. tfrisch
(posted 2017-09-26 03:26:02.0) Hello, thank you for contacting Thorlabs. The Polaris line is designed for applications where stability is key. Many laser science, inspection and testing, or vacuum applications require thermal, vibration, or wavefront stability not satisfied by standard optomechanical mounts. I would be glad to help you select an item that is suitable for your application if you reach email me at TechSupport@Thorlabs.com. klaus.ertel
(posted 2015-03-03 18:02:27.587) Hello,
Can the low distortion mounts be used with wedged optics (wedge angle approx. 0.5 deg or 30 arc min)?
Regards,
Klaus jlow
(posted 2015-05-19 12:42:29.0) Response from Jeremy at Thorlabs: The low distortion mount can be used with wedged optic (approximately 0.5deg wedge angle). Kintesh P. PhD.
(posted 2013-08-03 11:56:42.03) I've seen theses at the trade show for some time now so I'm glad they are finally available. So I have one question before I buy some - I have inquired about locks on the old Polaris mount and saw this answer from the other FeedBack page --
"A response from Adam at Thorlabs to h2004k: Currently, the Polaris mounts do not have locking mechanisms. The reason there is no locking mechanism is because during the lock engagement the alignment would shift significantly. Please note that the POALRIS mount can be comfortably adjusted to within 5 urad, and it was found to hold its alignment (within 5urad band) throughout multiple days of vigorous thermal cycling. Theoretically, the mount should be quite stable over the time frame of a few months, but do not have the test data to confirm this."
I noticed that this mount does have locks now so it seems there is some fundamental confusion on what is the truth. Please clarify... jlow
(posted 2013-08-07 09:49:00.0) Response from Jeremy at Thorlabs: For a lot of common lab setups, the lock nut is not a necessity. For applications such as shipping a system or systems with on board vibration, the lock nuts and face mounting of the optic are needed to prevent the optic from moving. The lock nuts in the POLARIS mounts allow the user to hold the adjuster still with one hand and lock the adjuster with the other hand. This approach allows the beam to be held on target during the locking procedure and it allows the user to lock down the adjuster on a target with better than 5µrad precision. For applications requiring optics to be face mounted, the lock nuts are generally requested which is one reason we include them. For the regular POLARIS-K1 and POLARIS-K05, we could offer the lock nuts as a special. |
Thorlabs offers several different general varieties of Polaris mounts, including kinematic side optic retention, SM-threaded, low optic distortion, piezo-actuated, vertical drive, and glue-in optic mounts, a fixed monolithic mirror mount and fixed optic mounts, XY translation mounts, 5-axis kinematic mount, and a kinematic platform mount. Refer to the tables below for our complete line of Polaris mounts, grouped by mount type, optic bore size, and then arranged by optic retention method and adjuster type (or intended application in the case of fixed mounts). We also offer a line of accessories that have been specifically designed for use with our Polaris mounts; these are listed in the table to the lower right. Note that the tables below list Item # suffixes that omit the "POLARIS" prefix for brevity. Click the photos below for details.
| Polaris Mount Adjuster Types | |||||
|---|---|---|---|---|---|
| Side Hole | Hex | Adjuster Knobs | Adjuster Lock Nuts |
Piezo Adjusters | Vertical-Drive Adjusters |
 |
 |
 |
 |
 |
 |
| Polaris Kinematic Mounts for Round Optics | ||||
|---|---|---|---|---|
| Optic Retention Method | Side Lock | SM Threaded | Low Distortion | Glue-In |
| Ø1/2" Optics | ||||
| 2 Side Hole Adjusters | - | - | - | -K05C4 -K05G4 |
| 2 Hex Adjusters | -K05S1 | -K05T1 | -K05F1 | - |
| 2 Adjusters with Lock Nuts | -K05S2 | -K05T2 | -K05F2 | - |
| 2 Piezoelectric Adjusters | -K05P2 | - | - | - |
| 2 Vertical Adjusters | -K05VS2 -K05VS2L |
- | - | - |
| 3 Hex Adjusters | -K05 | - | - | - |
| 3 Adjusters with Lock Nuts | - | -K05T6 | -K05F6 | - |
| 3 Adjuster Knobs (Tip/Tilt/Z) & 2 Hex Adjusters (X/Y) |
- | -K05XY | - | - |
| Ø19 mm (3/4") Optics | ||||
| 2 Side Hole Adjusters | -K19S4 | - | -K19F4/M | -K19G4 |
| Ø25 mm Optics | ||||
| 2 Side Hole Adjusters | -K25S4/M | - | -K25F4/M | - |
| Ø1" Optics | ||||
| 2 Side Hole Adjusters | -K1S4 | - | - | -K1C4 -K1G4 |
| 2 Hex Adjusters | -K1E2 -K1-2AH |
-K1T2 | -K1F2 | - |
| 2 Adjuster Knobs | - | -K1T1 | -K1F1 | - |
| 2 Piezoelectric Adjusters | -K1S2P | - | - | - |
| 2 Vertical Adjusters | -K1VS2 -K1VS2L |
- | - | - |
| 3 Side Hole Adjuster | -K1S5 | - | - | - |
| 3 Hex Adjusters | -K1E3 -K1-H |
-K1T3 | - | - |
| 3 Adjuster Knobs | -K1E -K1 |
-K1T | -K1F | - |
| 3 Piezoelectric Adjusters | -K1S3P | - | - | - |
| 3 Adjuster Knobs (Tip/Tilt/Z) & 2 Hex Adjusters (X/Y) |
- | -K1XY | - | - |
| Optic Retention Method | Side Lock | SM Threaded | Low Distortion | Glue-In |
| Ø1.5" Optics | ||||
| 2 Side Hole Adjusters | -K15S4 | - | -K15F4 | - |
| 2 Vertical Adjusters | -K15VS2 -K15VS2L |
- | - | - |
| 3 Adjuster Knobs (Tip/Tilt/Z) & 2 Hex Adjusters (X/Y) |
- | -K15XY | - | - |
| Ø50 mm Optics | ||||
| 2 Side Hole Adjusters | -K50S4/M | - | -K50F4/M | - |
| Ø2" Optics | ||||
| 2 Hex Adjusters | -K2S2 | -K2T2 | -K2F2 | - |
| 2 Adjuster Knobs | -K2S1 | -K2T1 | -K2F1 | - |
| 2 Piezoelectric Adjusters | -K2S2P | - | - | - |
| 2 Vertical Adjusters | -K2VS2 -K2VS2L |
- | - | - |
| 3 Hex Adjusters | -K2S3 | -K2T3 | -K2F3 | - |
| 3 Adjuster Knobs | -K2 | -K2T | -K2F | - |
| Ø3" Optics | ||||
| 2 Side Hole Adjusters | -K3S4 | - | - | - |
| 3 Side Hole Adjusters | -K3S5 | - | - | - |
| Ø4" Optics | ||||
| 2 Side Hole Adjusters | - | - | -K4F4 | - |
| Ø6" Optics | ||||
| 2 Side Hole Adjusters | - | - | -K6F4 | - |
| Polaris XY Translation Mounts for Round Optics | ||
|---|---|---|
| Optic Retention Method | SM Threaded | Representative Photos |
| Ø1/2" Optics |   |
|
| 2 Hex Adjusters (X/Y) | -05CXY | |
| -05XY | ||
| 3 Adjuster Knobs (Tip/Tilt/Z) & 2 Hex Adjusters (X/Y) |
-K05XY | |
| Ø1" Optics | ||
| 2 Hex Adjusters (X/Y) | -1XY | |
| 3 Adjuster Knobs (Tip/Tilt/Z) & 2 Hex Adjusters (X/Y) |
-K1XY | |
| Ø1.5" Optics | ||
| 2 Hex Adjusters (X/Y) & 3 Adjuster Knobs (Tip/Tilt/Z)zzz |
-K15XY | |
| Polaris Fixed Mounts for Round Optics | ||||||
|---|---|---|---|---|---|---|
| Optic Retention Method | Side Lock | Low Distortion |
Glue-In | Representative Photos |
||
| Ø1/2" Optics |     |
|||||
| Optimized for Mirrors | - | -B05F | -C05G | |||
| Optimized for Beamsplitters | -B05S | - | -B05G | |||
| Optimized for Lenses | - | - | -L05G | |||
| Ø19 mm (Ø3/4") Optics | ||||||
| Optimized for Mirrors | -19S50/M | - | - | |||
| Ø1" Optics | ||||||
| Optimized for Mirrors | - | -B1F | -C1G | |||
| Optimized for Beamsplitters | -B1S | - | -B1G | |||
| Optimized for Lenses | - | - | -L1G | |||
| Ø2" Optics | ||||||
| Optimized for Mirrors | - | -B2F | -C2G | |||
| Optimized for Beamsplitters | -B2S | - | - | |||
| Polaris Kinematic 1.8" x 1.8" Platform Mount | ||
|---|---|---|
| Optomech Retention Method | Tapped Holes & Counterbores |
 |
| 2 Adjuster Knobs | -K1M4(/M) | |
| Accessories for Polaris Mounts | |
|---|---|
| Description | Representative Photos |
| Ø1/2" Posts for Polaris Mounts |  |
| Ø1" Posts for Polaris Mounts | |
| Non-Bridging Clamping Arms |  |
| 45° Mounting Adapter |  |

- Knob-Driven Low-Distortion Mount Designed for Ø1" Opticsa
- 100 TPI Matched Actuator / Body Pairs
- Adjusters Feature Removable Knobs
- All-Stainless-Steel, Matched CTE Construction
- Less Than 1 µrad Deviation after Temperature Cycling (See the Test Data Tab)
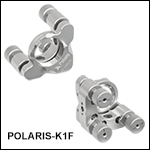
This Ø1" Polaris Low-Distortion Mirror Mount is designed to minimize optic distortion and provide long-term stability. This mount features a three-point-contact faceplate to mount the optic. The indexed optic retention spring makes contact with the optic at three locations, while the retaining ring has a calibrated adjustment stop to assist in providing the correct mounting torque. See the Optic Installation and Low Distortion tabs above for details. One of the three contact points of the faceplate incorporates a spring-loaded ball contact that also provides an adjustable mounting surface to further limit optic distortion; this is pictured in yellow in the cutaway diagram in the top of the Overview tab. Please note that this ball contact is factory set and it should not be adjusted or removed.
The POLARIS-K1F kinematic mirror mount is sold with one indexed optic retention spring (POLARIS-K1WS) and one retaining ring (POLARIS-SM1RRS40). These items are also available below for purchase separately should replacements be required.
The knobs on the 100 TPI adjusters are removable; with the knobs removed, the position can be adjusted with our HKTS-5/64 hex key thumbscrew (sold below), or any other 5/64" hex wrench. The adjusters can be locked using POLARIS-LN1 lock nut or POLARIS-LNS1 locking collar, which are available separately below. The beam can be held on target with the adjuster thumbscrew or hex key while lightly tightening the lock nut or locking collar by hand. Alternatively, a 13 mm hex open-ended wrench may be used for the POLARIS-LN1 lock nut, and a POLARIS-T2 spanner wrench may be used to tighten the POLARIS-LNS1 locking collar (see below for details). For applications that require frequent tuning of the adjusters, the lock nut or locking collar only needs to be lightly tightened to a torque of approximately 4 to 8 oz-in (0.03 to 0.06 N·m). For long term stability, we recommend tightening to a torque of 32 oz-in, which can be achieved by using our TW13 preset torque wrench (sold below).
Post mounting is provided by two #8 (M4) counterbored holes at 90°. 8-32 and M4 cap screws are included. For setting a precise location and mounting angle in custom mounting configurations, Ø2 mm alignment pin holes are located on both sides of each counterbore. Standard DIN 7-m6 ground dowel pins are recommended; for details, see the PDF drawing by clicking on the Docs icon (![]() ) below.
) below.
a. Please note that these mounts are designed for Ø1" optics with a tolerance of +0/-0.005".


Click to Enlarge
POLARIS-K1F2 2-Adjuster, Hex-Driven, Low-Distortion Mount

Click to Enlarge
POLARIS-K1F1 with POLARIS-LN1 lock nut installed. Two dowel pin holes on either side of the #8 counterbore are visible on the side of the mount.
- 2-Adjuster Low-Distortion Mount Designed for Ø1" Opticsa
- Knob- or Hex-Driven Design
- 100 TPI Matched Actuator / Body Pairs
- All-Stainless-Steel, Matched CTE Construction
- Less Than 2 µrad Deviation after Temperature Cycling (See Test Data Tab)
- Knobs are Removable
These 2-adjuster Ø1" Polaris Kinematic Mirror Mounts are similar to the standard 3-adjuster version sold above but feature a hardened steel ball in place of the third adjuster. They use an integrated matched adjuster/body design for greater durability. Both knob- and hex-driven versions of the 2-adjuster mount are available. These mounts have undergone extensive testing to ensure high-quality performance.
Each of these Polaris 2-adjuster kinematic mirror mounts is sold with one indexed optic retention spring (POLARIS-K1WS) and one retaining ring (POLARIS-SM1RRS40). These items are also available below for purchase separately should replacements be required.
The knobs on the POLARIS-K1F1 100 TPI adjusters are removable; with the knobs removed, the position can be adjusted with our HKTS-5/64 hex key thumbscrew (sold below), or any other 5/64" hex wrench. The adjusters can be locked using POLARIS-LN1 lock nut or POLARIS-LNS1 locking collar, which are available below. The beam can be held on target with the adjuster thumbscrew or hex key while lightly tightening the lock nut or locking collar by hand. Alternatively, a 13 mm hex open-ended wrench may be used for the POLARIS-LN1 lock nut, and a POLARIS-T2 spanner wrench may be used to tighten the POLARIS-LNS1 locking collar (see below for details). For applications that require frequent tuning of the adjusters, the lock nut or locking collar only needs to be lightly tightened to a torque of approximately 4 to 8 oz-in (0.03 to 0.06 N·m). For long term stability, we recommend tightening to a torque of 32 oz-in, which can be achieved by using our TW13 preset torque wrench (sold below).
Post mounting is provided by two #8 (M4) counterbored holes at 90°. 8-32 and M4 cap screws are included. For custom mounting configurations, Ø2 mm alignment pin holes are located on both sides of each counterbore for setting a precise location and mounting angle. Standard DIN 7-m6 ground dowel pins are recommended; for details, see the PDF drawing by clicking on the Docs icon (![]() ) below.
) below.
a. Please note that these mounts are designed for Ø1" optics with a tolerance of +0/-0.005".


Click to Enlarge
F25USK2 Knob Shown Attached to a POLARIS-K1E Mirror Mount
- Ø0.925" Knob for Additional Angular Resolution
- Clearance Hole Allows Access to Hex Socket of the Adjuster
This removable adjustment knob is compatible with many of our 1/4"-100 adjusters, including those used in the Ø1", Ø1.5", and Ø2" Polaris Kinematic Mounts and our Polaris Kinematic Platform Mount. The larger Ø0.925" size provides additional angular resolution over the standard Polaris knobs.
Please note that the F25USK2 knob is not compatible with Polaris mounts that use side-hole adjusters. The recessed bore of knob is not deep enough to allow the knob to engage the threads on the side-hole adjuster.

Click to Enlarge
POLARIS-K1C4 Mount with Optic and Optional POLARIS-N5 Removable Knobs
| Compatible Mounts |
|---|
| POLARIS-K25S4/M POLARIS-K25F4/M POLARIS-K1C4 POLARIS-K1G4 POLARIS-K1S4 POLARIS-K1S5 POLARIS-K15S4 POLARIS-K15F4 POLARIS-K50S4/M POLARIS-K50F4/M POLARIS-K2VS2 POLARIS-K2VS2L |
- For Convenient Adjustment of 1/4"-100 Adjusters
- Attaches Directly to Adjuster Threading
- Sold Individually
The Polaris® Removable Knobs for 1/4"-100 Adjusters allows the user to adjust a Polaris kinematic mirror mount by hand. The knobs can be used with select Polaris mounts, listed in the table to the right. Note that when the knobs are used with any of these mounts, they will block the side through holes on the adjuster. The adjuster screw's 5/64" (2 mm) hex socket is still usable when the knobs are attached.
The knobs are made from chemically cleaned and heat-treated 303 stainless steel that provides vacuum compatibility down to 10-9 Torr at 25 °C with proper bake out (10-5 Torr at 25 °C without bake out).

- For Convenient Adjustment of 5/64" and 2 mm Hex-Driven Actuators
- Red Anodized Adjustment Knob with Engraved Hex Size
- Replaceable Hex Tip
- Sold in Packages of 4
These 5/64" Hex Key Adjuster Thumbscrews allow for quick adjustment of many 5/64" and 2 mm hex-driven actuators (or standard actuators with the knobs removed). These temporary knobs can be left in the screw's hex socket between adjustments for convenience (see photo to the right). An 8-32 setscrew (5/64" hex) secures the replaceable hex bit, which can be reversed if the tip is stripped. Contact Tech Support to order replacement hex key bits.
We offer hex key thumbscrews in sizes from 0.050" to 3/16" and 2 mm to 5 mm.

- Provides Long-Term Adjuster Stability
- Compatible with Select Polaris Mounts
- Low Profile: Ø0.33" (Ø8.4 mm) x 0.08" (1.9 mm) Thick
- Tighten Along Rotational Axis Using the POLARIS-T2 Spanner Wrench
This locking collar is compatible with Polaris mounts that have 1/4"-100 adjusters, excluding the piezo-driven mounts and mounts with low-profile adjusters (Item #s POLARIS-K1E3 and POLARIS-K1E2). Designed for long-term adjuster stability or applications that are exposed to shock and vibration, these locking collars are pre-greased with the same ultra-high-vacuum-compatible, low-outgassing PTFE grease as the Polaris mounts and have been tested for adjuster fit.
The POLARIS-T2 spanner wrench has been specifically designed for use in securing the POLARIS-LNS1 locking collar. The double spanner head enables complete engagement while the design allows locking collar adjustments to be along the same line as the adjuster itself. A center through hole allows a 2 mm ball driver to pass through the spanner wrench, so that the adjuster can be held in position while the locking collar is engaged.
For applications that require frequent tuning of the adjusters, the locking collar only needs to be lightly tightened to a torque of approximately 4 to 8 oz-in (0.03 to 0.06 N·m). For long-term stability, we recommend tightening to a torque of 32 oz-in, which can be achieved by using our TW13 preset torque wrench (sold below) in combination with the POLARIS-T2 spanner wrench. To avoid cross threading the locking collar, place it against the adjuster and "unscrew" the collar until you feel a slight drop; then thread the collar onto the adjuster.

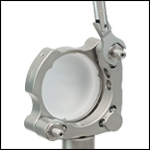
Click for Details
TW13 Torque Wrench Used to Secure POLARIS-LN1 Lock Nut on POLARIS-K2S2 Mirror Mount

Click to Enlarge
Each wrench is engraved with its preset torque value and Item #.
- Preset 32 oz-in Wrench for POLARIS-LN1 Lock Nut and POLARIS-T2 Spanner Wrench, as well as POLARIS-LN4 Lock Nut
- Break-Over Design Ensures Proper Torque is Applied
- Ideal for Applications Requiring Long-Term Locking
- Hex Size: 13 mm
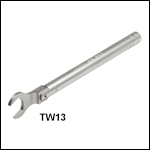
This torque wrench has a preset torque value to secure the lock nuts on Polaris mounts for long-term locking; see the table below for specifications. When the preset torque value has been achieved, the break-over design will cause the pivoting joint to "break," as shown to the right. The wrench's hex head will move back into place once the force is removed. This design prevents further force from being applied to the lock nut. Engraved guidelines indicate the angle the wrench should pivot in order to apply the specified torque; pivoting the handle past these guidelines will over-torque the lock nut. Each wrench is also engraved with its preset torque value, torque direction, wrench size, and Item # for easy identification in the field.
This wrench is designed to be compatible with cleanroom and vacuum chamber applications. It is chemically cleaned using the Carpenter AAA passivation method to remove sulfur, iron, and contaminants from the surface. After passivation, it is assembled in a clean environment and double vacuum bagged to eliminate contamination when transported into a cleanroom. Finally, it is bead blasted to minimize reflections when working with setups that include lasers.
Please note that this wrench is not intended for use in applications where adjusters are frequently tuned, as these applications typically require torque values of 4 to 8 oz-in (0.03 to 0.06 N·m).
| Item # | Torque | Torque Accuracy | Hex | Compatible Item #s |
|---|---|---|---|---|
| TW13 | 32 oz-in (0.23 N•m) | ±1.92 oz-in (0.014 N•m) | 13 mm | POLARIS-LN1, POLARIS-T2, POLARIS-LN4 |

To install a lock nut without cross threading, gently place the lock nut against the end of the adjuster. "Unscrew" the nut until the threads of the nut and the adjuster align before threading the nut onto the adjuster. This animation shows the installation of a POLARIS-LN1 lock nut on a POLARIS-K1F1 low-distortion mount.
- Provides Long Term Adjuster Stability
- Compatible with Select Polaris Mounts
- Internal 1/4"-100 Threading
- External 13 mm Hex
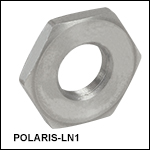
The POLARIS-LN1 Lock Nut is designed for use with Polaris kinematic mounts that have 1/4"-100 adjusters in applications that require long-term adjuster stability or setups that are exposed to shock and vibration; note that the lock nut should not be used with low-profile or vertical drive adjuster mounts. This lock nut is pre-greased with the same ultra-high-vacuum-compatible, low-outgassing PTFE grease as the Polaris mounts and has been tested for adjuster fit.
For applications that require frequent tuning of the adjusters, this lock nut only needs to be lightly tightened by hand to a torque of approximately 4 to 8 oz-in (0.03 to 0.06 N·m). If long term stability is required, the TW13 torque wrench below can be used to apply 32 oz-in (0.23 N·m) of torque to each lock nut. To avoid cross threading the lock nut, place it against the adjuster and "unscrew" the lock nut until you feel a slight drop; then thread the lock nut onto the adjuster.
 Products Home




 Zoom
Zoom


 Ø1" Low-Distortion Polaris Mirror Mounts