Post-Mountable XY Translation Mounts

- Provides Travel in the X and Y Directions
- Models for Ø1/2", Ø1", Ø2", and Rectangular Optics
Slip Plate
Positioners
SPT1N
SPT1CT
LM05XY
LM1XY
LM2XY
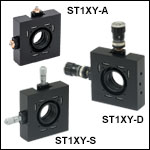
ST1XY-S
XYF1
6 mm XY
Travel Mounts
Translation Mounts for
Rectangular Optics
XYF2

Please Wait
 Click to Enlarge
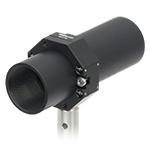
SM1-threaded lens tubes can be threaded onto both the front and back plate of the SPT1N slip plate mount.
 Click to Enlarge
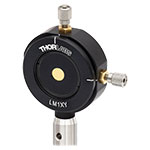
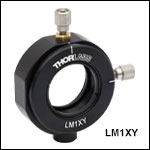
The LM1XY(/M) provides 1 mm travel in both X and Y with 250 µm per revolution for careful centering of lenses or pinholes.
Features
- XY Translation Mounts for Ø1/2", Ø1", Ø2", or Rectangular Optics
- Provides Precision XY Travel
- Slip-Plate, Adjuster-Screw, Micrometer, or Differential Drive Translation Modes
- Various Models Compatible with Our SM-Threaded Lens Tubes
- Post Mountable via One or More 8-32 (M4) Tapped Holes
Thorlabs offers a variety of mounts that provide coarse or precise XY translation when positioning optical components. The different models offered include slip plate positioners, Mini-Series compatible XY travel mounts, precision XY mounts, 6 mm XY travel mounts, as well as translation mounts for rectangular optics. All items featured on this page can accept Ø1/2", Ø1", Ø2", or rectangular optics directly. With the exception of Item #s XYF1(/M) and XYF2(/M), they can also accept optics mounted inside lens tubes with SM05 (0.535"-40), SM1 (1.035"-40), or SM2 (2.035"-40) threading (see table below).
| General Specifications | ||||||
|---|---|---|---|---|---|---|
| Item # | Description | Optic Size Accomodated |
SM Thread Compatibility | XY Travel | Post Mounting | Cage Compatibility |
| SPT1C(/M) | Slip Plate Positioners | Ø1" | SM1 (1.035"-40) | ±0.04" (±1 mm) |
8-32 (M4) Tap | 30 mm |
| SPT1CT(/M) | ||||||
| SPT1N(/M) | N/A | |||||
| MCXY05(/M) | Mini-Series Compatible XY Translation Mounts | Ø1/2" | SM05 (0.535"-40) | ±0.04" (±1 mm) |
4-40 (M3) Tap | 16 mm |
| LM05XY(/M) | Precision XY Translation Mounts | Ø1/2" | SM05 (0.535"-40) | ±0.04" (±1 mm) |
8-32 (M4) Tap | N/A |
| LM1XY(/M) | Ø1" | SM1 (1.035"-40) | ||||
| LM2XY(/M) | Ø2" | SM2 (2.035"-40) | ||||
| ST1XY-x(/M) | 6 mm XY Translation Mounts | Ø1" | SM1 (1.035"-40) | ±0.12" (±3.0 mm) |
Three 8-32 (M4) Taps | 30 mm |
| XYF1(/M) | Translation Mount for Rectangular Optics | 1/2" (12.7 mm) to 3" (76.2 mm) Wide Rectangular Optics |
N/A | X: 50 mm (1.97") Y: 30 mm (1.18") |
Five 8-32 (M4) Taps | N/A |
| XYF2(/M) | Translation Mount for Rectangular Optics | 2.95" (75.0 mm) to 3.03" (77.0 mm) Wide, 0.98" (25.0 mm) to 3.03" (77.0 mm) Tall, 0.04" (1.0 mm) to 0.07" (1.7 mm) Thick Rectangular Optics |
||||
Reading a Vernier Scale on a Linear Main Scale
Vernier scales are typically used to add precision to standard, evenly divided scales (such as the scales on Thorlabs' rotation, goniometric, or translation mounts). A vernier scale has found common use in many precision measurement instruments, the most common being calipers and micrometers. The vernier scale uses two scales side-by-side: the main scale and the vernier scale. The direct vernier scale has a slightly smaller spacing between its tick marks owing to the vernier scale having N ticks for every N - 1 ticks on the main scale. Hence, the lines on the main scale will not line up with all the lines on the vernier scale. Only one line from the vernier scale will match well with one line of the main scale, and that is the trick to reading a vernier scale.
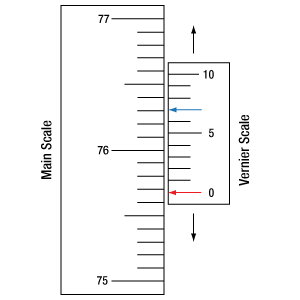
Figures 1 through 3 show a linear vernier scale system for three different situations. In each case, the scale on the left is the main scale, while the small scale on the right is the vernier scale. When reading a vernier scale, the main scale is used for the gross number, and the vernier scale gives the precision value. In this manner, a standard ruler or micrometer can become a precision instrument.
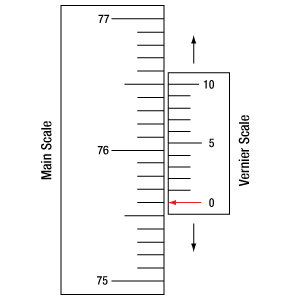
The 0 on the vernier scale is the "pointer" (marked by a red arrow in Figures 1 - 5) and will indicate the main scale reading. In Figure 1 we see the pointer is lined up directly with the 75.6 line. Notice that the only other vernier scale tick mark that lines up well with the main scale is 10. Since the pointer lines up with the main scale’s 75.6, the reading from Figure 1 is 75.60 (in whatever units the instrument measures).
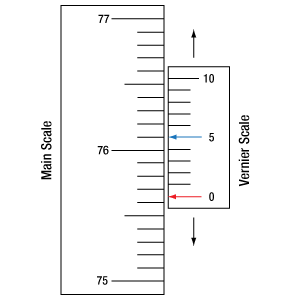
That is essentially all there is to reading a vernier scale. It's a very straightforward way of increasing the precision of a measurement instrument. To expound, let’s look at Figure 2. Here we see that the pointer is no longer aligned with a line on the main scale, but instead it is slightly above 75.6 and below 75.7; thus, the gross measurement is 75.6. The first vernier line that coincides with a main scale line is the 5, shown with a blue arrow. The vernier scale gives the final digit of precision; since the 5 is aligned to the main scale, the precision measurement for Figure 2 is 75.65.
Since this vernier scale is 10% smaller than the main scale, moving the vernier scale by 1/10 of the main scale will align the next vernier marking. This asks the obvious question: what if the measurement is within the 1/10 precision of the vernier scale? Figure 3 shows just this. Again, the pointer line is in between 75.6 and 75.7, yielding the gross measurement of 75.6. If we look closely, we see that the vernier scale 7 (marked with a blue arrow) is very closely aligned to the main scale, giving a precision measurement of 75.67. However, the vernier scale 7 is very slightly above the main scale mark, and we can see that the vernier scale 8 (directly above 7) is slightly below its corresponding main scale mark. Hence, the scale on Figure 3 could be read as 75.673 ± 0.002. A reading error of about 0.002 would be appropriate for
this instrument.
Click to Enlarge
Figure 1: An example of how to read a vernier scale. The red arrow indicates what is known as the pointer. Since the tick mark labeled 10 on the vernier scale aligns with one of the tick marks on the main scale, this vernier scale is reading 75.60 (in whatever units the instrument measures).
Click to Enlarge
Figure 2: The red arrow indicates the pointer and the blue arrow indicates the vernier line that matches the main scale. This scale reads 75.65.
Click to Enlarge
Figure 3: The red arrow indicates the pointer, and the blue arrow indicates the vernier line that matches the main scale. This scale reads 75.67 but can be accurately read as
75.673 ± 0.002.
Reading a Vernier Scale on a Rotating Main Scale
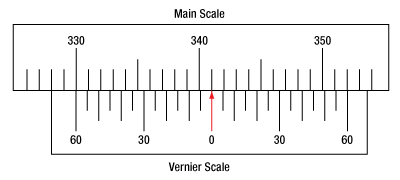
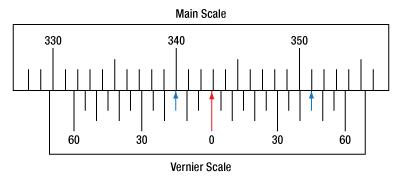
The vernier scale may also be used on rotating scales where the main scale and vernier scale do not share units. Figures 4 and 5 show a vernier scale system for two different situations where the main scale is given in degrees and the vernier scale has ticks every 5 arcmin (60 arcmin = 1°). In each case, the scale on the top is the main scale, while the small scale on the bottom is the vernier scale.
In Figure 4 we see the pointer is lined up directly with the 341° line. Notice that the only other vernier scale tick marks that line up well with the main scale are ±60 arcmin. Since the pointer lines up with the main scale at 341°, the reading from Figure 4 is 341.00°.
There are two ways to determine the reading if the zero on the vernier scale line is between two lines of the main scale. For the first method, take the line on the left side of the pointer on the vernier scale and subtract that value (in arcmin) from the value on the main scale that is to the right on the main scale. As an example, in Figure 5 the vernier pointer is between 342° and 343°; using the left blue arrow of the vernier scale results in
As we've seen here, vernier scales add precision to a standard scale measurement. While it takes a bit of getting used to, with a little practice, reading these scales is fairly straightforward. Vernier scales, whether they are direct or retrograde*, are read in the same fashion.
*A retrograde vernier scale has a larger spacing between its tick marks with N ticks for every N + 1 ticks on the main scale.
Click to Enlarge
Figure 4: An example of a vernier scale where the main scale and the vernier scale are in different units (degrees and arcmins, respectively). The red arrow indicates the pointer. This scale reads 341.00°.
Click to Enlarge
Figure 5: The red arrow indicates the pointer and the blue arrows give the precision value from the vernier scale.
This scale reads 342.75°.
| Posted Comments: | |
user
(posted 2019-07-26 10:28:59.56) I would like this product a lot more if it had locking screws on the adjusters like the cage mount version. I am leaning towards using a competitors product at the moment because of the lack of locking screws. Alternately, could you add post mounting to the CXY1? YLohia
(posted 2019-07-29 09:41:39.0) Hello, thank you for your feedback. We are currently in the process of developing a post-mountable version of the CXY1. I have posted your suggestion regarding the lockable adjusters on our internal engineering forum for further consideration. sebastien.sauvage
(posted 2016-12-08 08:13:44.477) When I add the metric LM1XY/M in my metric basket, the interface tells me that in red "There is a mixture of Imperial and Metric items in your shopping cart.". tfrisch
(posted 2016-12-14 01:31:38.0) Hello, thank you for contacting Thorlabs. I have reached out to you directly for more details on the contents of your cart. scottie730318
(posted 2014-04-18 12:15:12.64) Do the LM1XY and LM1XY/M has the same Ø1"(25.4 mm)?
Are the LM1XY and LM1XY/M are different at the LM1XY for 8-32 Mounting Hole and LM1XY/M for M4 x 0.7 Mounting Hole, respectively?
Thanks
Best Regards jlow
(posted 2014-04-18 03:10:52.0) Response from Jeremy at Thorlabs: Yes, the only difference between the LM1XY and the LM1XY/M is the mounting hole on the bottom (#8-32 vs. M4). Thorlabs
(posted 2010-08-26 13:47:57.0) Response from Javier at Thorlabs to Daniel: Thank you for your feedback. We will modify the LM1XY mount accordingly. I will keep you updated of the progress, and will also send you a prototype. daniel.sauder
(posted 2010-08-26 10:34:46.0) Please incorporate 2 mounting points to the LM1XY stages, opposite both adjustment screws, so that the mount can be used in either orientation. The side adjustment screw interferes with my setup, and I can not turn it around, since the adjustments only work on one side. Laurie
(posted 2009-01-22 10:52:27.0) Response from Laurie at Thorlabs: Thank you for your interest in our LM2XY Translation Mount. Due to the use of adhesives, you will not be able to take this component fully apart. It is also not intended for high vacuum use above 1E-3 Torr due to the anodizing, grease, and epoxy used. However, we are able to create custom items that would be suitable for vacuums up to 1E-6 Torr values. If you are interest in pursuing that avenue, please contact our technical support staff. daniel.s.barber
(posted 2009-01-20 16:20:56.0) I want to take apart an LM2xy and a lm1xy so that they can be cleaned for high vacuum use. How do I take them apart? Dan mtortoreto
(posted 2007-12-13 11:36:56.0) HPT1 added to page. jmills
(posted 2007-12-12 17:08:24.0) I see a picture of the HPT1 and it is discussed in the over view but it does not appear to order from this page |

Click to Enlarge
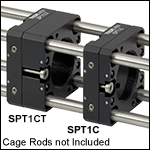
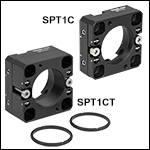
The SPT1CT and SPT1C Slip Plates assembled in a cage system using the ER series cage rods.
- ±0.04" (±1.0 mm) of Adjustment in Both X and Y Directions
- Center-Located SM1 (1.035"-40) Threaded Hole in Front Slip Plate and Smooth Bore in Fixed Back Plate
- Position Front Plate by Hand and Lock in Place by Tightening Locking Screws
- Secure Back Plate to Four Cage Rods via Side-Located Setscrews
- 8-32 (M4) Threaded Hole in Base of Back Plate for Post Mounting
The SPT1C(/M) and SPT1CT(/M) Slip Plate Positioners are designed to provide coarse XY positioning of optical components within our 30 mm Cage Assembly System. This design provides for manual adjustment only and is best utilized in conjunction with an alignment laser to monitor centricity. The front plate can be locked into position against the fixed plate via two locking screws, which can be tightened using a 5/64" (2 mm) hex key.
The SPT1C(/M) slip plate accomodates Ø1" optics up to 0.08" (2.0 mm) thick, while the thicker front plate on the SPT1CT(/M) can hold Ø1" optics up to 0.34" (8.6 mm) thick. Unmounted optics can be secured with SM1RR Retaining Rings, two of which are included with the SPT1CT(/M). The center-located SM1 (1.035"-40) tapped through hole also directly accepts externally SM1-threaded components. Four through holes in the back plate of each mount with side-located locking screws accept ER series cage rods for compatibility with our 30 mm cage systems.
| Item # | Travel | Slip Plate Thickness | Maximum Optic Thickness | Optic Mounting | Post Mounting | ER Cage Rod Attachment |
|---|---|---|---|---|---|---|
| SPT1C(/M) | ±0.04" (±1.0 mm) |
0.23" (5.8 mm) | 0.08" (2.0 mm) | SM1 (1.035"-40) Thread |
8-32 (M4 x 0.7) Tap on Bottom Surface |
4 Through Holes with Side-Located Locking Screws, 5/64" (2 mm) Hex |
| SPT1CT(/M) | 0.50" (12.7 mm) | 0.34" (8.6 mm) |

- ±0.04" (±1 mm) of Coarse Adjustment in Both X and Y Directions
- SM1 (1.035"-40) Threaded Hole in Front Adjustment Plate and Back Plate
- Position Front Plate by Hand and Lock using Screws with 5/64" (2.0 mm) Hex
- Secure Back Plate to a Ø1/2" Post via the Bottom-Located 8-32 (M4) Tap
The SPT1N(/M) Slip Plate Positioner is designed to provide coarse XY positioning of optical components. Both the front slip plate and back plate feature a center-located SM1-threaded hole ideal for use with our SM1 Lens Tubes. This design provides for manual adjustment only and is best utilized in conjunction with an alignment laser to monitor centricity. The threaded front plate is spring loaded against the fixed, threaded back plate and can be locked into position via two locking screws. These locking screws can be threaded into the front side of the mount, or they can be removed and then re-threaded into the back side.
The front slip plate of the SPT1N(/M) accommodates Ø1" optics up to 0.07" (1.8 mm) thick, while the thicker back plate can hold Ø1" optics up to 0.19" (4.8 mm) thick. Unmounted optics can be secured with two SM1RR Retaining Rings (not included). The center-located SM1 (1.035"-40) tapped through holes in both the front and back plates also directly accept externally SM1-threaded components. Components should not be threaded past the end of either plate, as this will prevent the front slip plate from working properly. Please see the table below for the individual plate thicknesses.
| Item # | Travel | Front Slip Plate Thickness |
Back Plate Thickness |
Front Plate Maximum Optic Thickness |
Back Plate Maximum Optic Thickness |
Optic Mounting |
Post Mounting |
|---|---|---|---|---|---|---|---|
| SPT1N(/M) | ±0.04" (±1 mm) | 0.23" (5.8 mm) | 0.35" (8.9 mm) | 0.07" (1.8 mm) | 0.19" (4.8 mm) | SM1 (1.035"-40) Thread | 8-32 (M4) Tap on Bottom Surface |


Click to Enlarge
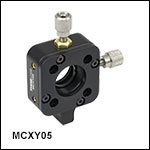
An SM05L10 Lens Tube mounted in an MCXY05 Translation Mount. The mount is secured on an MSP1.5 Mini-Series Post.
- ±1.0 mm (±0.04") of Travel in X and Y
- M3 x 0.2 Adjusters Provide 200 µm/rev Resolution
- Hold Ø1/2" Optics up to 0.23" (5.8 mm) Thick with Included SM05RR Retaining Ring
- Ø0.43" (Ø10.9 mm) Clear Aperture with Retaining Ring
- SM05 (0.535"-40) Threads on Back Plate for Compatibility with Ø1/2" Lens Tubes
- 4-40 (M3 x 0.5) Mounting Hole for Mini-Series Post Mounting
Thorlabs' MCXY05(/M) Translation Mount provides ±1.0 mm (±0.04") of X and Y travel for Ø1/2" optics. The front and back plate of the mount are stationary, while the inner carriage can move in the X and Y directions in the plane perpendicular to the optical axis. The adjusters provide 200 µm translation per revolution and may be actuated by hand or using a 0.05" (1.3 mm) hex key or balldriver. A
4-40 (M3 x 0.5) mounting hole located on the bottom of the mount allows it to be mounted on our Mini-Series Posts. Additionally, four through holes with 0.05" (1.3 mm) hex setscrews accept Ø4 mm cage rods for compatibility with our 16 mm cage systems. If replacement setscrews are needed, we offer SS4B013 brass setscrews, which use a 0.05" (1.3 mm) hex.
The MCXY05(/M) mount contains internal SM05 (0.535"-40) threads suitable for mounting Ø1/2" (12.7 mm) optics up to 0.23" (5.8 mm) thick using the included SM05RR retaining ring. The optic is held in place by the retaining ring and a retaining lip built into the SM05-threaded carriage. The center of the optic carriage is 0.89" (22.7 mm) above the base of the mount when the carriage is centered. Thorlabs' SPW603, SPW603L, or SPW801 Spanner Wrenches can be used to tighten or remove the SM05RR retaining ring.
| Item # | Travel | Drive Type | Drive Mechanism | Optic Mounting | Post Mounting | SR Cage Rod Attachment |
|---|---|---|---|---|---|---|
| MCXY05(/M) | ±1.0 mm (±0.04") | M3 Adjustment Screw |
200 µm per Revolution M3 x 0.2 Adjustment Screws with 0.05" (1.3 mm) Hex |
SM05 (0.535"-40) Thread |
4-40 (M3 x 0.5) Tapped Hole on Bottom |
4 Through Holes with Side-Located Locking Screws, 0.05" (1.3 mm) |

- High Resolution Adjusters Provide 250 µm/rev for Micron Sensitivity
- Compatible with Our Extensive Selection of SM05, SM1, and SM2 Lens Tubes
- Designed to Center Ø1/2", Ø1", and Ø2" Optics in a Beam Path
- Bottom-Located 8-32 (M4) Tap Enables Direct Mounting to a Ø1/2" Post
- Tip/Tilt Deviation: <100 µrad
Thorlabs offers XY translation mounts equipped with high-resolution adjusters for positioning Ø1/2", Ø1", or Ø2" optical components. The LM05XY(/M) accepts Ø1/2" optics up to 0.41" (10.3 mm) thick, the LM1XY(/M) holds Ø1" optics up to 0.30" (7.5 mm) thick, and the LM2XY mounts Ø2" optics up to 0.51" (13 mm) thick. All these mounts utilize SM series threads to secure the optic, making them compatible with virtually any externally threaded SM series component. M3 x 0.25 fine adjustment screws provide up to ±0.04" (±1 mm) of travel perpendicular to the optical axis. The adjustment screws enable 250 µm/rev translation resolution, and there is a 5/64" hex socket in the back end of each screw. In addition, a hex key may be used to achieve small incremental movements.
Please note that the moving SM-threaded world may be manually rotated and may also rotate during translation.
| Item # | Travel | Drive Type | Drive Mechanism | Optic Mounting | Post Mounting |
|---|---|---|---|---|---|
| LM05XY(/M) | ±0.04" (±1 mm) | M3 Adjustment Screw |
250 µm per Revolution M3 x 0.25 mm Adjustment Screws with 5/64" (1.5 mm) Hex |
SM05 (0.535"-40) Thread | 8-32 (M4) Tapped Hole on Bottom |
| LM1XY(/M) | SM1 (1.035"-40) Thread | ||||
| LM2XY(/M) | SM2 (2.035"-40) Thread |

- Accepts Ø1.00" Optics up to 0.48" (12.2 mm) Thick
- Compact Design; ±0.12" (±3.0 mm) Travel
- Compatible with Our Ø1" SM1 Lens Tubes
- 4-40 Taps on Front and Back Provide 30 mm Cage Compatibility
The ST1XY translation mounts offer ±3.0 mm of travel provided by one of three drive types: adjuster screw, micrometer, or differential drive. They utilize hardened tool steel components on all moving parts to ensure long-term, drift-free operation. The ST1XY is designed to connect with our extensive line of Ø1" SM1 Lens Tubes as well as our 30 mm cage assemblies to offer great flexibility when building optical systems.
The translating SM1-threaded carriage accepts optics up to 0.48" (12.2 mm) thick when using two SM1RR retaining rings (included). A stationary internal SM1 thread with 0.14" (3.5 mm) depth is present on the other side of the mount that allows for coupling to stationary SM1 Lens Tubes. Three 8-32 (M4) tapped holes are provided on the bottom surface to allow direct mounting on our Ø1/2" Posts.
Thorlabs also offers the CXY1A XY Translator, which has Ø6 mm through holes for cage rods, as opposed to the 4-40 taps on the ST1XY translation mounts. These through holes permit the CXY1A to slide along the optic axis.
The ST1XY-D(/M) features DM22 differential drives. For more information about this drive, including operation and adjustment knob reattachment, please visit our DM22 differential drive page.
| Item # | Travel | Drive Type |
Drive Mechanism | Optic Mounting |
Post Mounting |
ER Cage Rod Connection |
|---|---|---|---|---|---|---|
| ST1XY-A(/M) | ±0.12" (±3.0 mm) |
100 TPI | 0.01" (0.25 mm) per Revolution and 100 Threads per Inch Adjusters (Locking Set Screw on Each Adjuster Uses 0.035" Hex Key) |
SM1 (1.035"-40) Thread |
Three 8-32 (M4) Tapped Holes on Bottom Surface |
4-40 Tapped Holes or Counterbored Mounting Using ST1CP |
| ST1XY-S(/M) | Micrometer | 0.5 mm per Revolution and 10 µm per Graduation Micrometer Screws | ||||
| ST1XY-D(/M) | Differential | 0.4 mm per Revolution Coarse and 25 µm per Revolution Fine Control with 0.5 µm per Graduation Differential Micrometers |

- Designed Specifically for Use with the ST1XY Series of XY Translators (Featured Above)
- Connect Two Internally Threaded Cage Components with ER Rods
- SM1 (1.035"-40) Threaded Through Hole
- Four 4-40 Screws Included
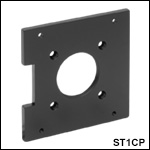
The ST1CP is a bolt-on adapter designed specifically for use with the ST1XY-series of XY translators. Like our ERSCB adapter, this plate can be used to connect two internally threaded cage components with ER rods. First thread the four included 4-40 screws through the ST1CP through hole and into the internally bored side of the ER rod (as shown in the figure to the left). Then, remove the back plate on an ST1XY stage and secure this adapter plate in its place using the four outer 2-56 counterbored through-holes. Once attached, this adapter plate keeps the cage and any SM1-threaded component attached to the adapter plate stationary, while enabling an optic inside the ST1XY stage to move relative to these fixed components.
Alternatively, this adapter can also be attached to the front side (i.e., the side without the removable mount) of an ST1XY stage using the included 4-40 screws. In this case, the front side of the ST1XY stage will no longer be cage compatible (although the back side still is). However, the advantage of this configuration is that two SM1-compatible components can be attached to the ST1XY stage (one on each side) and an optic inside the stage can be moved relative to these fixed components.


Click to Enlarge
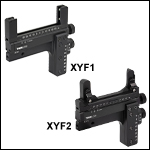
A channel on the XYF1(/M) mount allows for translation of the lockable support arms for accommodating optics with different widths.

Click to Enlarge
The push bar on the XYF2(/M) mount moves the spring clips out to install a rectangular optic.
- Two Sizes Available
- XYF1(/M): 1/2" (12.7 mm) to 3" (76.2 mm) Wide Rectangular Optics with a Max Thickness of 0.16" (4 mm)
- XYF2(/M): 2.95" (75.0 mm) to 3.03" (77.0 mm) Wide, 0.98" (25.0 mm) to 3.03" (77.0 mm) Tall Optics with a Thickness of 0.04" (1.0 mm) to 0.07" (1.7 mm)
- 50 mm (1.97") Horizontal Travel and 30 mm (1.18") Vertical Travel
- Each Axis Includes a Vernier Scale that Provides 100 µm Resolution
- 8-32 (M4) Tapped Holes Support Six Post-Mounted Orientations
Thorlabs' XYF1(/M) Two-Axis Mount accepts a 1/2" (12.7 mm) to 3" (76.2 mm) wide rectangular optic up to 0.16" (4 mm) thick. The XYF2(/M) Two-Axis Mount accepts 2.95" (75.0 mm) to 3.03" (77.0 mm) wide, 0.98" (25.0 mm) to 3.03" (77.0 mm) tall, and 0.04" (1.0 mm) to 0.07" (1.7 mm) thick microscope slides and other optics. The mounts are ideal for general applications as well as home-built microscopy systems. The XYF1(/M) is designed for use with our selection of resolution, distortion, slant edge, and calibration test targets. In addition, it is also compatible with our rectangular microscope slides, filters, dichroic mirrors, variable ND filters, and fluorescence imaging filters. While the XYF2(/M) was designed for use with our microscope slides, it may also be used with a select range of resolution, distortion, and calibration test targets as well as filters and fluorescence imaging filters that do not exceed the size parameters. Alternatively, to accommodate other optic shapes and sizes, Thorlabs' XYA1(/M) translation adapter provides the same translation range as the XYF1(/M) and XYF2(/M) mounts, but features counterbores and threaded holes for mounting a fixed optic mount, such as a fixed filter holder.
Two actuator knobs on the side of each mount enable manual positioning over a 50 mm (1.97") x 30 mm (1.18") area. As an alternative to using the knobs, the actuators can also be adjusted using a 5/64" (2 mm) hex key (not included). Each axis of translation is equipped with a vernier scale that provides a resolution of 100 µm, allowing for repeatable positioning of the mounted optic. Each actuator can be locked by a 5/64" (2 mm) hex setscrew. Five 8-32 (M4) tapped holes support six possible mounting orientations when used with our Ø1/2" posts, of which a selection are shown below.
Optics are secured in the XYF1(/M) mount with two support arms that each contain two 5/64" (2 mm) hex, nylon-tipped setscrews. Each support arm can slide along a channel in the mount to accommodate different optic sizes; a 5/64" (2 mm) hex setscrew is used to lock each support arm in place. This mounting mechanism can be seen in the photo to the upper right. By loosening the top locking screws, the arms can be removed from the channel and reversed, as shown in the image to the bottom left. When reattaching the arms, simply align each locking screw with one of the 2-56 captive nuts in the channel and tighten. This feature is useful in applications that require the target to be positioned close to a lens or other optical element in a system. Please note that the support arms overlap the optic by 4.4 mm on each side.
Optics are secured in the XYF2(/M) mount using two fixed spring clips. Please note that the distance between the two cannot be adjusted. To install a microscope slide in the XYF2(/M) mount, gently press on the push bar, lifting up the spring clips, and slide the optic in (see photo to the right). A 1.3 mm (0.05") hex setscrew below each spring clip allows fine adjustment of the distance between it and the back plate.

Click for Details
The support arms on the XYF1(/M) mount can be removed from the channel and reversed by loosening the locking screws.

Click to Enlarge
The mounts have five 8-32 (M4) taps, allowing for six post-mountable orientations (see images to the right).
The XYF2(/M) (left and middle) and XYF1(/M) (right) mounts can be used to position a rectangular optic
(Item # R1L3S6P) horizontally, vertically, or perpendicular to the post axis.
 Products Home


 Zoom
Zoom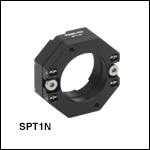


 Post-Mountable XY Translation Mounts