Photomultiplier Modules (PMTs)
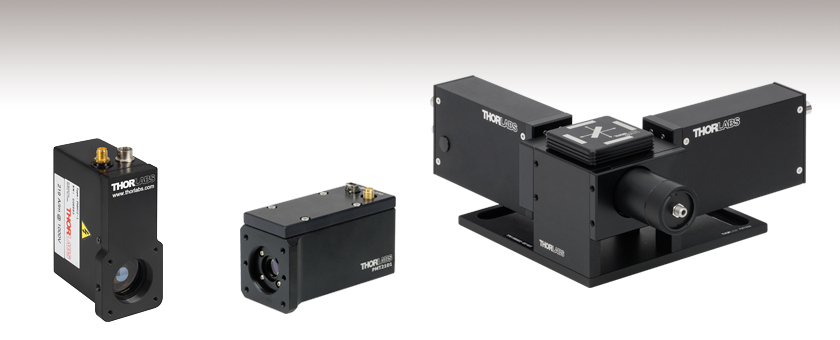
- Several Models Cover 185 - 920 nm Wavelength Range
- Alkali and GaAsP Photocathodes Available
- SM1 or C-Mount Threads for Filters or Lens Tubes
- Models Designed for Single- and Multi-Channel
Detection
PMM02
300 - 800 nm
Multialkali, Standalone
PMT2101
300 - 720 nm
GaAsP, Standalone
PMTSS2
185 - 900 nm
Multialkali, Two Channels

Please Wait
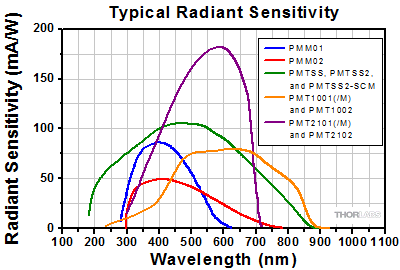
Click to Enlarge
Click for Logarithmic Plot
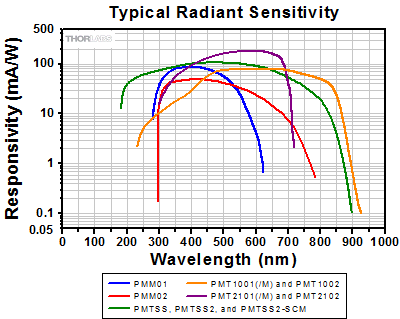
This graph shows typical radiant sensitivity curves for our PMT modules. The PMT2101(/M) and PMT2102 provide the highest radiant sensitivity, but are also the most susceptible to degradation from high intensity illumination. The PMM01, PMM02, PMT1001(/M), PMT1002, PMT2101(/M) and PMT2102 feature built-in transimpedance amplifiers for simpler integration with setups. The PMM01, PMM02, PMT1001(/M), and PMT2101(/M) also offer internal SM1 threads and four 4-40 taps for direct compatibility with our SM1 lens tubes and 30 mm cage system.
Features
- Bialkali, Multialkali, and GaAsP Detectors for Wavelengths from 185 nm to 920 nm
- Typical Radiant Sensitivities from 51 mA/W to >176 mA/W (See Graph to the Right)
- Various Mounting Features (See Selection Guide Tab)
- Some Models Offer Built-In Transimpedance Amplifiers
- PMTSS2 Modules are Designed for Building Expandable Multi-Channel Imaging Setups
- Control Software for 64-Bit Windows® 7 or 10 (See Software Tab)
Photomultiplier tubes (PMTs) are used to detect faint optical signals from weakly emitting sources. Compared to avalanche photodetectors (APDs), they offer significantly larger active areas, making them ideal for capturing signals that may be diverging due to scatter or nonlinear optical effects. These PMTs are controlled with an included software package designed for use with 64-Bit Windows® 7 or 10, which provides a GUI for adjusting gain, output offset voltage, and bandwidth. This software package includes .NET, C++, and LabVIEW drivers.
Thorlabs offers PMTs utilizing alkali or GaAsP detector elements, which offer sensitivity in the UV, visible, and NIR. Their performance can be quantified by their quantum efficiency (in %), which describes how many incident photons are converted to photoelectrons. The quantum efficiency is closely related to the radiant sensitivity (in mA/W), as shown in the equation in footnote b below. Radiant sensitivity curves for Thorlabs' PMTs are given in the graph to the right.
In order to generate high internal gain, the electrons initially generated at the PMT's photocathode are accelerated by a high-voltage potential, on the order of kV. This potential causes the electrons to strike several dynodes that generate secondary electrons. The photocurrent that has accumulated after the final dynode stage represents the amplified signal and is collected by an anode. (See the PMT Tutorial tab for more details.) All of our PMT modules feature built-in high-voltage circuitry that eliminates the need for a standalone high-voltage source, reducing the package's footprint and risk of electric shock.
The photocurrent collected at the anode is typically sent into a transimpedance amplifier that converts the current into a voltage and provides additional amplification. Our PMM01, PMM02, PMT1001(/M), PMT1002, PMT2101(/M), and PMT2102 modules include a built-in transimpedance amplifier, allowing them to be connected directly to lab equipment that requires voltage signals. In contrast, the PMTSS, PMTSS2, and PMTSS2-SCM have no built-in amplifier. They are compatible with our TIA60 Transimpedance Amplifier, as well as other transimpedance amplifiers, which are available separately.
| PMT Comparisona | Standalone | Multi-Channel | ||||
|---|---|---|---|---|---|---|
| Item # | PMM01 | PMM02 | PMTSS | PMT1001(/M) PMT1002 |
PMT2101(/M) PMT2102 |
PMTSS2 PMTSS2-SCM |
| Photocathode Material | Bialkali | Multialkali | Multialkali | Multialkali | GaAsP | Multialkali |
| Wavelength Range | 280 - 630 nm | 300 - 800 nm | 185 - 900 nm | 230 - 920 nm | 300 - 720 nm | 185 - 900 nm |
| Radiant Sensitivityb (Typ.) |
80 mA/W (at 400 nm) | 51 mA/W (at 420 nm) | 105 mA/W (at 450 nm) | 78 mA/W (at 630 nm) | 176 mA/W (at 550 nm) | 105 mA/W (at 450 nm) |
| Photocathode Active Area |
Ø22 mm | Ø21 mm | 3.7 mm x 13.0 mm (H x V) |
Ø8 mm | Ø5 mm | 3.7 mm x 13.0 mm (H x V) |
| Transimpedance Amplifier |  |
 |
Not Included (Compatible with TIA60) |
 |
 |
Not Included (Compatible with TIA60) |
Standalone Alkali PMTs
| Item # | PMM01 | PMM02 | PMTSS | PMT1001(/M) | PMT1002 |
|---|---|---|---|---|---|
| Detector Specifications | |||||
| Wavelength Range | 280 - 630 nm | 300 - 800 nm | 185 - 900 nm | 230 - 920 nm | |
| Peak Wavelength (λp) | 400 nm | 420 nm | 450 nm | 630 nm | |
| Radiant Sensitivity at λpa (Typ.) |
80 mA/W | 51 mA/W | 105 mA/W | 78 mA/W | |
| Quantum Efficiency at λpa (Calculated from Radiant Sensitivity) |
25% | 15% | >28% | >15% | |
| PMT Gain (Max) | 7.1 x 10⁶ | 5.1 x 10⁵ | >1.0 x 10⁷ See Graphs Tab for PMT Gain vs. Control Voltage |
>3.0 × 10⁶ See Graphs Tab for PMT Gain vs. Control Voltage |
|
| HV Control Voltage (Max) | 0 V to +1.8 Vb | 0 V to +1.25 Vb | +0.25 V to +1.00 V (Recommended) +0.25 V to +1.20 V (Maxc) |
+0.50 V to +1.10 V Software Controlled |
|
| Control Voltage Connector | 2.5 mm Mono Jack | M8 x 1 Power Connector | USB Mini | ||
| PMT Voltage | 0 V to -1800 Vb,d | 0 V to -1250 Vb,d | +250 V to +1000 V (Recommended) +250 V to +1200 V (Maxc) |
+500 V to +1100 V | |
| Photocathode Active Area | Ø22 mm | Ø21 mm | 3.7 mm x 13.0 mm (H x V) | Ø8 mm | |
| Dark Currente | 0.3 - 3 nA (at 20 °C) | 3 nA (Typ.) 20 nA (Max) (After 30-Minute Storage in Darkness) |
2 nA (Typ.) 10 nA (Max) |
10 nA (Typ.) 100 nA (Max) |
|
| Dark Count Ratee |
100 s-1 (at 20 °C) | - | - | - | |
| Warm-Up Time Before Applying Control Voltagee | <10 s | 30 to 60 Minutes | 30 to 60 Minutes | ||
| Anode Currentf | 100 µA (Max)g | 10 µAh | 100 µAh | ||
| Rise and Fall Time | 15 µs | 1.4 ns | 0.57 ns (Rise)i | ||
| Photocathode Type | Bialkali | Multialkali | Multialkali | Multialkali | |
| Photocathode Geometry | Head On | Side On | Head On | ||
| Window | Borosilicate, Plano-Concave (n = 1.49) |
UV-Transmitting Glass (n = 1.48) |
Borosilicate, Flat Window (n = 1.487) |
||
| Transimpedance Amplifier Specifications | |||||
| Transimpedance Gain | High Z: 1 x 10⁶ V/A 50 Ω: 5 x 10⁵ V/A |
No Amplifier Included | 11000 +1000 / -500 V/A | ||
| Amplifier Bandwidth (at 6 dB)j | DC to 20 kHz | N/A | Software Configurable DC to 80 MHz, 2.5 MHz, or 250 kHz |
||
| Amplifier Noise (Typ.) | 2 mV (RMS) | N/A | 5.8 pA / √Hz (Total Input Noise at DC to 80 MHz Bandwidth) 6.5 pA / √Hz (Input Current Noise at 1 MHz, Cin = 4 pF) |
||
| Amplifier Offset (Typ.) | 1 mV | N/A | ±103 µV / °Ck | ||
| Output Signall | |||||
| Output Voltage | 0 - 10 V (High Z) 0 - 5 V (50 Ω) |
N/A | ±1.5 V (50 Ω) | ||
| Output Current | N/A | 10 µA (Max) | N/A | ||
| Connector | SMA | BNC | SMA | ||
| Physical Specifications | |||||
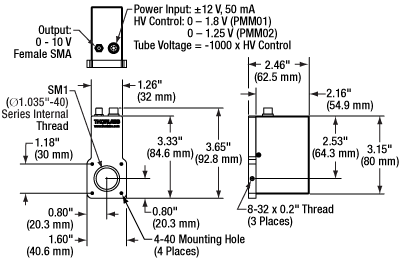
| Module Dimensions | 3.65" x 1.60" x 2.46" (92.8 mm x 40.6 mm x 62.5 mm) |
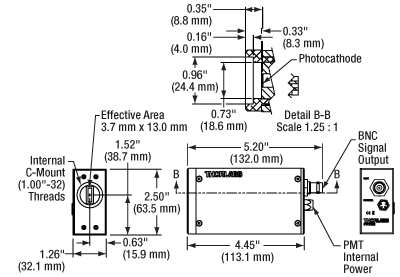
5.20" x 1.26" x 2.50" (132.0 x 32.1 x 63.5 mm) |
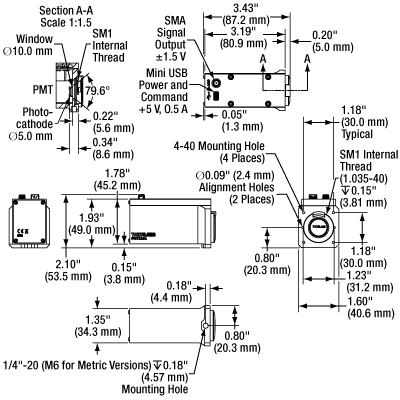
3.43” x 1.60” x 2.10” (87.2 mm x 40.6 mm x 53.5 mm) |
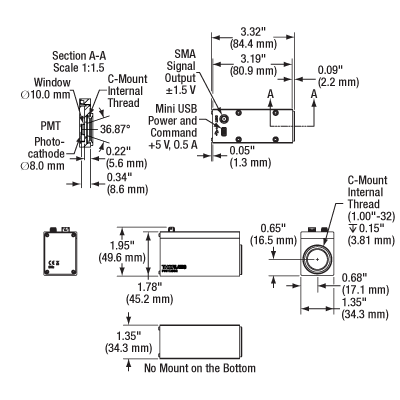
3.32" x 1.35" x 1.95" (84.4 mm x 34.3 mm x 49.6 mm) |
|
| Power Input |
+12 V Pin: 40 mA Max, +12 V to +15 V -12 V Pin: 10 mA Max, -12 V to -15 V |
15 VDC, 7 mA Max | 5 VDC +4.5 V to +5.5 V 350 mA Typ., 500 mA Max |
||
| Included Power Supply | ±12 VDC (100/120/230 VAC, 50 or 60 Hz, Switchable)m |
- | - | ||
| Operating Temperature | 5 to 55 °C | 15 to 40 °C | 5 to 50 °C | ||
| Storage Temperature | -40 to 55 °C | -20 to 50 °C | -20 to 50 °C | ||
| Module Weight |
200 g (0.44 lbs) | 200 g (0.44 lbs) | 0.3 kg (0.66 lbs) | 300 g (0.66 lbs) | |
| Mounting Options | |||||
| Internal SM1 Threads |  (In Front of Window) (In Front of Window) |
 (In Front of Window) (In Front of Window) |
- |  (In Front of Window) (In Front of Window) |
- |
| Internal C-Mount Threads | - | - |  (In Front of Window) (In Front of Window) |
- |  (In Front of Window) (In Front of Window) |
| Mounting Holes | Three 8-32 Taps (8-32 to M4 Adapter Included) |
Three 8-32 Taps (8-32 to M4 Adapter Included) |
- | 1/4"-20 (M6) Tap | - |
| 30 mm Cage System |  (Four 4-40 Taps) (Four 4-40 Taps) |
 (Four 4-40 Taps) (Four 4-40 Taps) |
- |  (Four 4-40 Taps) (Four 4-40 Taps) |
- |
GaAsP PMTs
| Item # | PMT2101(/M) | PMT2102 |
|---|---|---|
| Detector Specifications | ||
| Wavelength Range | 300 - 720 nm | |
| Peak Wavelength (λp) | 580 nm | |
| Radiant Sensitivitya (Typ.) | 176 mA/W at 550 nm | |
| 108 mA/W at 420 nm | ||
| Quantum Efficiencya (Calculated from Radiant Sensitivity) |
39% at 550 nm (Typical)b | |
| 32% at 420 nm (Typical)b | ||
| PMT Gain (Max) | >1.0 × 10⁶ | |
| Control Voltage | +0.50 V to +0.80 V (Recommended) +0.5 V to +1.0 V (Maxc) Software Controlled |
|
| Control Voltage Connector | USB Mini | |
| PMT Voltage | +500 V to +800 V (Recommended) +500 V to +1000 V (Max) |
|
| Photocathode Active Area | Ø5 mm | |
| Dark Count Rated, e |
6000 s-1 (at 25 °C, Typical) 18000 s-1 (at 25 °C, Maximum) |
|
| Warm-Up Time Before Applying Control Voltagee |
30 to 60 minutes (at 25 °C) | |
| Anode Currentf | 500 µA (Max) | |
| Rise Timeg | 1.00 ns | |
| Photocathode Type | GaAsP | |
| Photocathode Geometry | Head On | |
| Window | Borosilicate, Flat Window | |
| Transimpedance Amplifier Specifications | ||
| Transimpedance Gain | 11000 +1000 / -500 V/A | |
| Amplifier Bandwidth (at 6 dB)h,i |
Software Configurable DC to 80 MHz, 2.5 MHz, or 250 kHz |
|
| Amplifier Noisei (Typ.) | 5.8 pA / √Hz (Total Input Noise at DC to 80 MHz Bandwidth) 6.5 pA / √Hz (Input Current Noise at 1 MHz, Cin = 4 pF) |
|
| Amplifier DC Offset Drift (Typ.) | ±103 µV / °C | |
| Maximum Inputj | ±500 μA | |
| Output Signalk | ||
| Output Voltage | ±1.5 V (50 Ω) | |
| Output Current | N/A | |
| Connector | SMA | |
| Physical Specifications | ||
| Module Dimensions | 3.43” × 1.60” × 2.10” (87.2 × 40.6 × 53.5 mm) |
3.32" × 1.35" × 1.95" (84.4 × 34.3 × 49.6 mm |
| Power Input |
5 VDC (+4.5 V to +5.5 V) 350 mA Typ., 500 mA Max |
|
| Operating Temperature | 5 to 35 °C | |
| Storage Temperature | -20 to 50 °C | |
| Module Weight |
300 g (0.66 lb) | |
| Mounting Options | ||
| Internal SM1 Threads |  (In Front of Window) (In Front of Window) |
- |
| Internal C-Mount Threads | - |  (In Front of Window) (In Front of Window) |
| Mounting Holes | 1/4"-20 (M6) Tap | - |
| 30 mm Cage System |  (Four 4-40 Taps) (Four 4-40 Taps) |
- |
Multi-Channel PMTs
| Item # | PMTSS2 | PMTSS2-SCM |
|---|---|---|
| Detector Specifications | ||
| Wavelength Range | 185 - 900 nm | |
| Peak Wavelength (λp) | 450 nm | |
| Radiant Sensitivity at λpa (Typ.) |
105 mA/W | |
| Quantum Efficiency at λpa (Calculated from Radiant Sensitivity) |
>28% | |
| PMT Gain (Max) | >1.0 × 10⁷ See Graphs Tab for PMT Gain vs. Control Voltage |
|
| Control Voltage | +0.25 V to +1.00 V (Recommended) +0.25 V to +1.20 V (Maxb) |
|
| Control Voltage Connector | M8 x 1 Power Connector | |
| PMT Voltage | +250 V to +1000 V (Recommended) +250 V to +1200 V (Maxb) |
|
| Photocathode Active Area | 3.7 mm × 13.0 mm (H × V) | |
| Dark Currentc | 2 nA (Typ.) 10 nA (Max) |
|
| Dark Count Ratec |
- | |
| Warm-Up Time Before Applying Control Voltagec |
30 to 60 Minutes | |
| Anode Currentd | 10 µA (Max) | |
| Rise and Fall Time | 1.4 ns | |
| Photocathode Type | Multialkali | |
| Photocathode Geometry | Side On | |
| Window | UV-Transmitting Glass (n = 1.48) | |
| Transimpedance Amplifier Specifications | ||
| Transimpedance Gain | No Amplifier Included | |
| Amplifier Bandwidth (at 6 dB)e |
N/A | |
| Amplifier Noise (Typ.) | N/A | |
| Amplifier Offset (Typ.) | N/A | |
| Output Signalf | ||
| Output Voltage | N/A | |
| Output Current | 10 µA (Max) | |
| Connector | BNC | |
| Physical Specifications | ||
| Module Dimensions | 10.18" × 8.09" × 3.40" (258.5 × 205.5 × 86.4 mm) |
8.09" × 2.43" × 3.40" (205.5 × 61.8 × 86.4 mm) |
| Power Input |
15 VDC, 7 mA Max | |
| Operating Temperature | 15 to 40 °C | |
| Storage Temperature | -20 to 50 °C | |
| Module Weight |
1.4 kg (3.08 lb) | 0.9 kg (1.98 lb) |
| Mounting Options | ||
| Internal SM1 Threads |  (On Input Port and (On Input Port andFilter Cube) |
 (On Input Port and (On Input Port andFilter Cube) |
| Internal C-Mount Threads |  (In Front of Windowg) (In Front of Windowg) |
 (In Front of Windowg) (In Front of Windowg) |
| Mounting Holes | 1/4" (M6) Counterbored Slots | 1/4" (M6) Counterbored Slots |
| 30 mm Cage System | - | - |
Alkali PMTs
Click to Enlarge
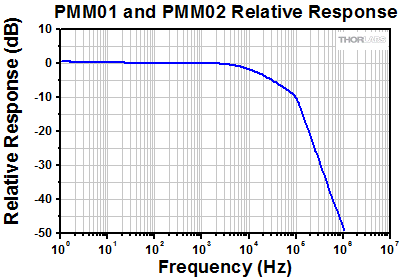
Relative Response of PMM01 and PMM02 Modules
Click to Enlarge
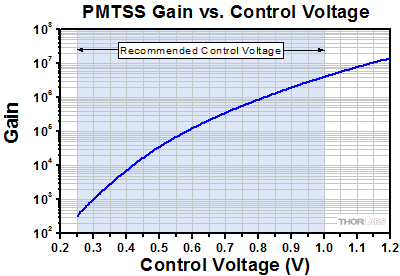
Gain of PMTSS, PMTSS2, and PMTSS2-SCM Modules
Although the PMT may be operated up to a maximum control voltage of +1.20 V, operation beyond the recommended control voltage range may decrease the PMT's operational lifetime.
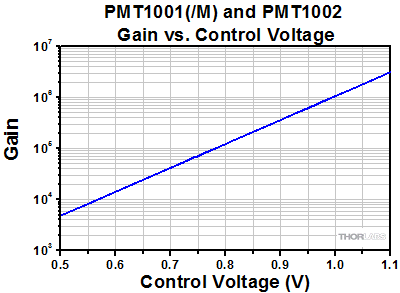
Click to Enlarge
Gain of PMT1001(/M) and PMT1002
GaAsP PMTs
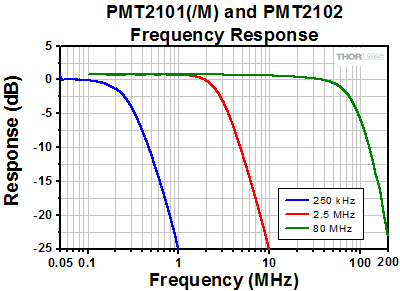
Click to Enlarge
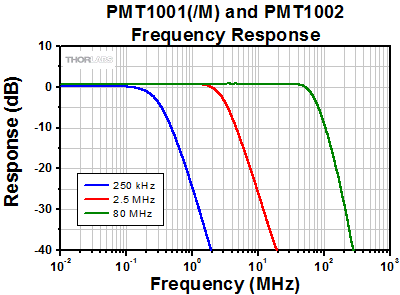
Amplifier Frequency Response of PMT2101(/M) and PMT2102
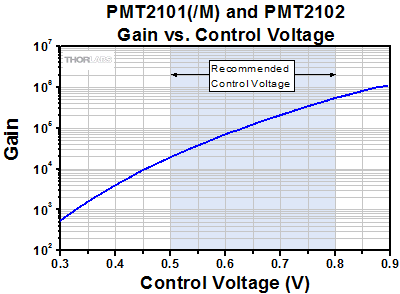
Click to Enlarge
Gain of PMT2101(/M) and PMT2102
Although the PMT may be operated up to a maximum control voltage of +1.0 V, operation beyond the recommended control voltage range may decrease the PMT's operational lifetime.
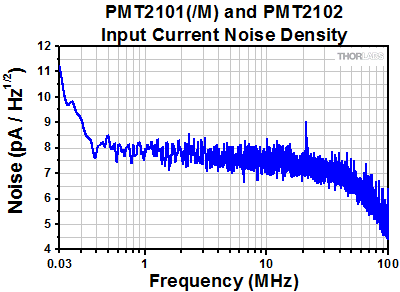
Click to Enlarge
Input Current Noise Density of PMT2101(/M) and PMT2102
Standalone Alkali PMTs
Click to Enlarge
PMM01 and PMM02 Mechanical Drawing
Click to Enlarge
PMTSS Mechanical Drawing
Click to Enlarge
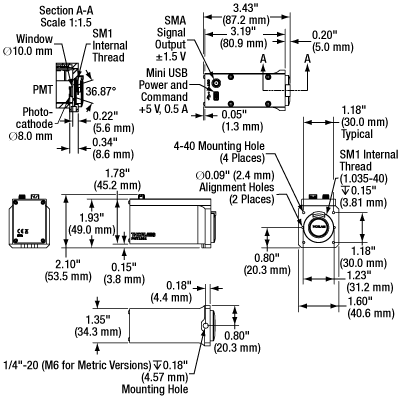
PMT1002 Mechanical Drawing
GaAsP PMTs
Click to Enlarge
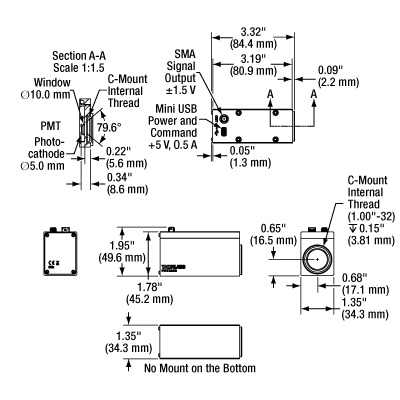
PMT2101(/M) Mechanical Drawing
Click to Enlarge
PMT2102 Mechanical Drawing
PMTs for Multi-Channel Detection
PMM01 and PMM02 Modules
These PMT modules ship with a Y-cable for control voltage and power (6-pin Hirose to 2.5 mm mono jack and 3-pin Lumberg power connector). This cable is pictured in the Shipping List tab.
Connectors on PMT Module
Power Connector
6-Pin Hirose
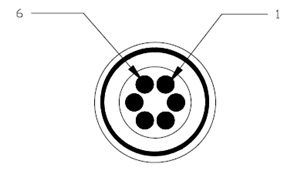
| Pin | Assignment |
|---|---|
| 1 | Power Supply Input (+12 VDC to +15 VDC) |
| 2 | Power Supply Input (-12 VDC to -15 VDC) |
| 3 | 0 V |
| 4 | 0 V |
| 5 | No Connection |
| 6 | Control Voltage (PMM01: 0 V to +1.8 V) (PMM02: 0 V to +1.25 V) |
Output Signal
Female SMA

Output Voltage:
0 - 5 V (50 Ω)
0 - 10 V (High Z)
Connectors on Y-Cable
Power Supply Connection
3-Pin Lumberg RKMC-3
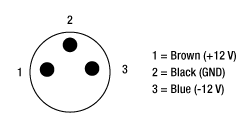
| Pin | Assignment |
|---|---|
| 1 | Power Supply Input (+12 VDC to +15 VDC) |
| 2 | Ground |
| 3 | Power Supply Input (-12 VDC to -15 VDC) |
Control Voltage
2.5 mm Mono Plug

Tip: Ground
Barrel: 0 to +1.25 VDC
PMT1001(/M), PMT1002, PMT2101(/M), and PMT2102 Modules
These PMT modules ship with a SMA to SMB cable and a Mini USB to USB A cable. These cables are pictured in the Shipping List tab.
Power Connector
USB Mini

Input Voltage:
+0.50 V to +1.10 V [PMT1001(/M) and PMT1002]
+0.50 V to +0.80 V
[Recommended Range for PMT2101(/M) and PMT2102]
Output Signal
Female SMA

Output Voltage:
±1.5 V (50 Ω)
PMTSS, PMTSS2, and PMTSS2-SCM Modules
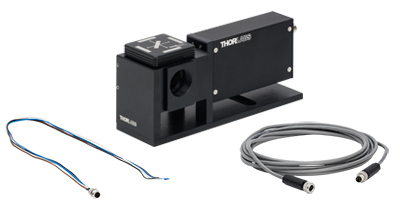
These PMT modules ship with a male M8 x 1 connector with colored wire leads. This connector is pictured in the Shipping List tab.
Power Connector
Female M8 x 1
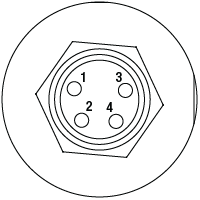
| Pin | Assignment | Wire Colora |
|---|---|---|
| 1 | Power Supply Input (+15 VDC) | Brown |
| 2 | Control Voltage (Recommended: +0.25 V to +1.00 V; Maxb: +0.25 V to +1.20 V) |
White |
| 3 | No Connection | Blue |
| 4 | Power Supply Return (Ground) | Black |
Output Signal
BNC Female
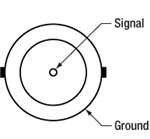
Output Current: 10 µA (Max)
Click to Enlarge
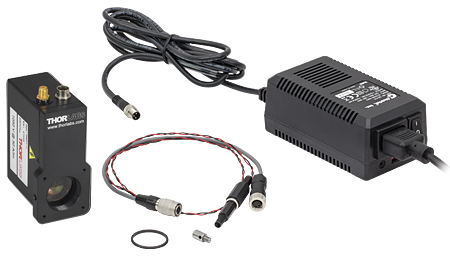
PMM01 and PMM02 Contents
PMM01 and PMM02
Item #'s PMM01 and PMM02 consist of:
- PMT Module
- SM1RR Retaining Ring
- AS4M8E 8-32 to M4 Thread Adapter
- Y-Cable for Control Voltage and Power (6-pin Hirose to 2.5 mm Mono Jack and 3-pin Lumberg
Power Connector) - 2.5 mm Mono Plug
- ±12 V Power Supply with Region Specific Power Cord
Click to Enlarge
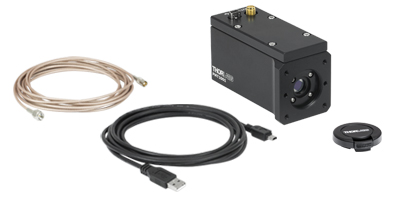
PMT1001(/M) Contents
PMT1001(/M)
Item # PMT1001(/M) consists of:
- PMT Module
- USB 2.0 Cable (A to Mini)
- SMA to SMB Cable
- SM1 End Cap
Click to Enlarge
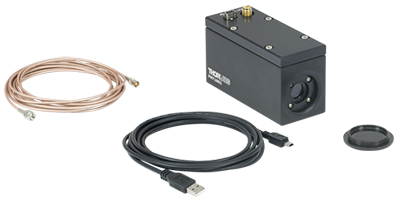
PMT1002 Contents
PMT1002
Item # PMT1002 consists of:
- PMT Module
- USB 2.0 Cable (A to Mini)
- SMA to SMB Cable
- C-Mount Lens Cap (Replacement Item # CMCP2)
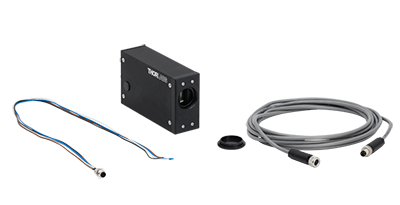
Click to Enlarge
PMTSS Contents
PMTSS
Item # PMTSS consists of:
- PMT Module
- Male M8 x 1 Connector with Colored Wire Leads
- M8 x 1 Extension Cord
- C-Mount Cap (Replacement Item # CMCP2)
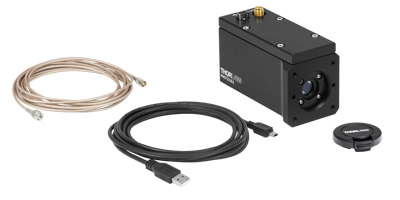
Click to Enlarge
PMT2101(/M) Contents
PMT2101(/M)
Item # PMT2101(/M) consists of:
- PMT Module
- USB 2.0 Cable (A to Mini)
- SMA to SMB Cable
- SM1 End Cap
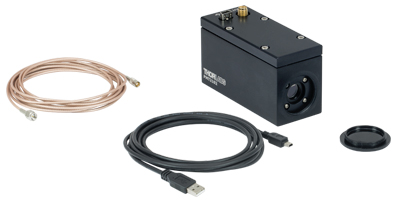
Click to Enlarge
PMT2102 Contents
PMT2102
Item # PMT2102 consists of:
- PMT Module
- USB 2.0 Cable (A to Mini)
- SMA to SMB Cable
- C-Mount Lens Cap (Replacement Item # CMCP2)
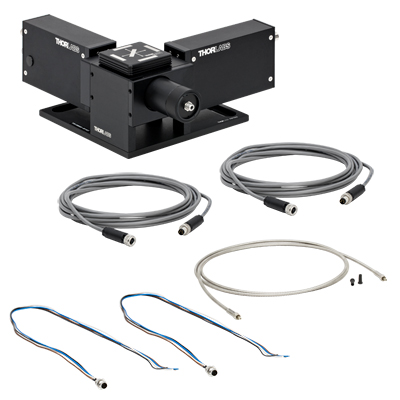
Click to Enlarge
PMTSS2 Contents
PMTSS2
Item # PMTSS2 consists of:
- Two Detachable PMT Modules
- DFM1T1 Filter Cube Top
- Mechanical Housing with SMA905-Terminated Fiber Collimation Assembly and Male Dovetail for
PMTSS2-SCM Add-On Module - Two Male M8 x 1 Connectors with Colored Wire Leads
- Two M8 x 1 Extension Cords
- Ø910 µm Core, 0.22 NA, SMA905-Terminated Fiber Patch Cable for 250 - 1200 nm
Click to Enlarge
PMTSS2-SCM Contents
PMTSS2-SCM
Item # PMTSS2-SCM consists of:
- Detachable PMT Module
- DFM1T1 Filter Cube Top
- Mechanical Housing with Female Dovetail for the PMTSS2 Module and Male Dovetail for Additional
PMTSS2-SCM Modules - Male M8 x 1 Connector with Colored Wire Leads
- M8 x 1 Extension Cord
The PMT1001(/M), PMT1002, PMT2101(/M), and PMT2102 standalone PMTs can be controlled using Thorlabs' software. The software download page below offers a link to the GUI interface as well as a LabVIEW™ software development kit (SDK) to allow these PMTs to be controlled using custom imaging software. The most recent firmware for these PMTs is available as well.
Choosing a Photomultiplier Tube for Your Application
Introduction
Since the first commercial photomultiplier tube (PMT) was developed in the early 1940s, it has remained the detector of choice for experiments requiring fast response times and high sensitivity. Today, the PMT is a staple for research in many fields including analytical chemistry, particle physics, medical imaging, industrial process control, astronomy, and atomic and molecular physics. This tutorial provides introductory material for the principle of operation and key specifications to consider when choosing a PMT for a given application.
Basic Principle of Operation
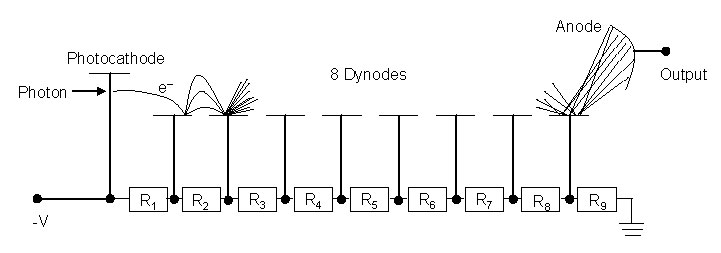
Photomultiplier Tubes (PMTs) are sensitive, high-gain devices that provide a current output that is proportional to the incident light. The PMT consists of a glass vacuum tube that houses a photoemissive material called a photocathode, 8 - 14 secondary emitting electrodes called dynodes, and a collection electrode called an anode. If a photon with sufficiently high energy (i.e. more energy than the binding energy of the photocathode material) is incident on the photocathode, it is absorbed, and an electron is released in accordance with the photoelectric effect. Since the first dynode is maintained at a higher potential than the cathode (thereby creating a potential difference between these two elements), the ejected electron will accelerate toward the dynode and crash into it, releasing secondary electrons. Typically, 3 - 5 secondary electrons are released during this process. Each of these 3 - 5 electrons is then in turn accelerated toward and crashes into the second dynode, thereby releasing 3 - 5 more electrons. This process continues through the entire dynode chain providing an electron gain of 3 - 5. Typically, each dynode is maintained at a potential that is 100 - 200 V higher than the previous one. At the end of the dynode chain, the electrons are collected by the anode and a current pulse is output. However, to read that pulse, the current usually needs to be converted to a voltage; the simplest way to do this is to connect a low load resistance across the anode and ground. Thorlabs' PMM01 and PMM02 modules use a transimpedance amplifier (TIA) to convert the nA- or µA-scale current output by the anode to a voltage in the mV or V range, respectively. In comparison, our PMTSS, PMTSS2, and PMTSS2-SCM modules do not include a TIA.
For example, if a PMT consists of 8 dynodes as shown in the figure below and each electron is able to produce 4 secondary electrons, the total current amplification after traveling through the dynode chain will be 48 ≈ 66,000. Each photoelectron for this example PMT produces a charge avalanche at the anode of Q = 48e. The corresponding voltage pulse is V = Q/C = 48e /C where C is the capacitance of the anode (including connections). If the capacitance is 5 pF, the output voltage pulse will be 2.1 mV.
Spectral Response
When choosing a PMT for a given application, the photocathode material should be matched to the intended application. Generally, the long-wavelength cutoff is determined by the photocathode, while the window material determines the short-wavelength cutoff. PMTs are manufactured for wavelengths from the deep UV through the infrared. However, since the photocathode is responsible for converting incident photons into electrons, the efficiency with which it does this for the wavelength of interest is of utmost importance. There are a variety of materials used for photocathodes, each with a different work function and each intended for use in a different spectral range.
Quantum Efficiency (QE) is a specification that is usually expressed as a percentage and is associated with the PMTs ability to convert incident photons into detectable electrons. For instance, a QE value of 20% means that one in every five photons that strike the photocathode will produce a photoelectron. For photon counting, it is desirable to have a PMT with a high QE value. Since QE is dependent upon wavelength, it is important to choose a PMT with the best quantum efficiency over the wavelength range of interest. It should be noted that photocathodes for the visible portion of the electromagnetic spectrum typically have QE values that are less than 30%.
The QE of a PMT can be quickly calculated from its spectral response plot (see the Graphs tab) by using the following equation:
![]()
where S is the radiant sensitivity in units of A/W and λ is the wavelength in nm.
Geometries
PMTs are available primarily with two different geometries: head-on (i.e. the photocathode is located at either end of the vacuum tube) and side-on (i.e. the photocathode element is located on the side of the vacuum tube). Head-on PMTs have semitransparent photocathodes and are characterized by large collection surfaces, better spatial uniformity, and better performance in the blue and green spectral regions. For applications requiring a wide spectral response, such as spectroscopy, the head-on geometry is preferable. In contrast, side-on PMTs have opaque photocathodes and are preferable for applications in the UV and IR. This configuration tends to be less expensive than head-on and is widely used in spectrometers and for applications requiring efficient optical coupling and high QE such as scintillation counting.
The 8 - 14 secondary emitting electrodes (i.e., dynodes) are often arranged in one of two configurations: linear or circular. Linear dynode arrays (such as the one shown in the figure above) are popular due to their fast time response, good time resolution, and excellent pulse linearity. The circular cage-type array is found on all side-on PMTs and some head-on PMTs. This configuration is compact and offers fast response times.
Gain
PMTs are unique because they are capable of amplifying very weak signals produced by photocathodes to detectable levels above the readout circuitry noise without introducing substantial noise. In a PMT, the dynodes are responsible for producing this amplification, which is referred to as gain. Gain is highly dependent on the voltage being applied. PMTs can operate well above the manufacturer's stated high voltage recommendation, yielding gains that are 10 - 100 times above spec; this generally has no detrimental affects to the PMT if the anode current is kept well below the rated value.
Dark Current
Ideally, all of the signal produced by a photocathode would be due to current generated by light incident on the tube. However, in reality, PMTs will produce currents regardless of whether light is present. The signal that results in the absence of light is known as dark current, and it effectively degrades the signal-to-noise ratio of the PMT. Dark current is due mainly to the thermionic emission of electrons from the photocathode and first few dynodes but with far smaller contributions from cosmic rays and radioactive decay. In general, tubes designed for use in the red part of the spectrum will exhibit more dark current than others due to the lower binding energy of red-sensitive photocathodes. If it is assumed that the primary source of dark current is thermionic emission from the photocathode, the dark count rate is given by:
Since thermionic emission depends highly on the photocathode's temperature and work function, cooling a PMT will greatly reduce dark current counts. Offered in configurations with our Confocal and Bergamo microscope systems, a PMT equipped with a thermoelectric cooler can be cooled from 20 °C to 0 °C, reducing the dark current by a factor of ~10. When using a thermoelectric cooler, care should be taken to avoid condensation at the window since this moisture will reduce the amount of light incident on the photocathode. In addition, excessive cooling should be avoided, as it can actually have adverse effects. These effects include signal reduction or voltage drops across the cathode, since the resistance of the cathode film is inversely proportional to the temperature.
Rise Time
For experiments demanding high time resolution, short rise times are a must. Anode pulse rise time is the most commonly specified time response characteristic for a PMT and is defined as the time required for the output of the PMT to rise from 10% to 90% of its peak amplitude when the photocathode is fully illuminated. Our PMTs' rise times are listed in the Specs tab.
Ultimately, the pulse rise time is determined by the spread in transit times for the different electrons. These times vary for several reasons. First, the initial velocities of secondary electrons will vary because they are released from different depths within the dynode material. Some electrons will have no initial energy when leaving the dynode whereas other will have a non-zero initial energy; hence, the latter arrive at the next dynode in a shorter time period. In addition to the variation in initial ejected electron speed, transit time spread is also caused by electron path length variations. Due to these effects, the rise time of an anode pulse will decrease with increasing voltage as V-1/2.
Other Considerations
There are several other important considerations. First, choose the electronics that will be used with the PMT carefully. Small changes in the high voltage applied across the cathode and anode can dramatically change the output. Second, the lab environment can also affect the performance of the PMT. Changes in temperature and humidity as well as the presence of vibrations all negatively affect tube operation. Finally, the tube's housing is of importance; not only does it shield the tube from external and extraneous light, but it can also reduce the effects of external magnetic fields. Magnetic fields of a few gauss can greatly reduce the gain, but these adverse affects can be minimized by creating a magnetic shield from a high permeability material.
| Posted Comments: | |
Antonio Miguel Caravaca Aguirre
(posted 2024-11-08 11:20:32.323) I have purchased two PMT1001s. I typically use the software provided with no issues. I wanted to implement the control of the voltage and gain on my python GUI. I managed to write code in python to interact with the PMT using the dll library and the c code examples. However, when I use my GUI with the same code, the PMT is not detected and I can't interact with the PMT. Do you have any python examples to control the PMT? EGies
(posted 2024-11-18 11:24:36.0) Thank you for contacting Thorlabs. I have reached out to you directly to discuss further troubleshooting steps. For future troubleshooting inquiries, you can email us directly at techsupport@thorlabs.com. Frank DeLucia
(posted 2023-07-18 10:27:51.62) I have purhcased several of these PMT1001s and am quite happy with there ease of use and performance. IS there any chance you have a 32 bit version of the software that operates them? I have a certain application that is run by a computer with a 32 bit operating system. Thank you cdolbashian
(posted 2023-07-25 09:17:02.0) Thank you for reaching out to us with this feedback! At this time, we are unable to provide a 32-bit software for these PMTs. I apologize for the inconvenience. Zhang Rui
(posted 2023-06-16 17:48:21.82) We are researchers from Peking University. We bought the PMT of PMM02-1 before. Would you like to know whether there is a supporting data acquisition card or the recommended acquisition card? Thanks! cdolbashian
(posted 2023-06-21 11:09:04.0) Thank you for reaching out to us with this inquiry. Looking at the specs tab above, these PMTs output an analog voltage signal up to +-10V with speeds up to 25kHz. You would simply need to find a data acquisition card which can support these speeds and voltage inputs. I have contacted you directly to discuss this further. Oscar Gomez Calderon
(posted 2023-04-26 07:06:47.91) Dear Sir, we are interested in the PMT2100 Series. We have a computer with windows 7 32bit. Is it possible to use the control software in a 32 bit computer or is there any other way to control the PMT?
Thank you very much ksosnowski
(posted 2023-05-01 09:33:18.0) Thanks for reaching out to Thorlabs. Unfortunately the PMT2100 software package was never built for 32 bit environments, and there is not a straightforward way to enable this functionality for our application. We apologize for this inconvenience. Shouwen Ma
(posted 2023-02-23 19:24:29.98) I have a question about setting the output offset rather than a feedback.
I am a new user of PMT2101/M for a Galvo-resonant scanner. It is not clear to me to the instruction 6.5.3. - Setting the PMT2100 Offset. (use the table below to configure all the PMT 2100s.) should I close all the light and capture images with output offset 0v, then increase the gain until average pixel values is 50-100. Do I eventually take the value of the gain as the value of output Offset? Or should I set an value of output offset, then adjust the gain until average pixel values is 50-100? and what value should I give?
Or should I leave the output offset on throlabs control panel always to be 0 and use the software such as scanImage to measure the output offset as indicated here https://docs.scanimage.org/Configuration/PMT/index.html.
I am looking forward to your information.
Shouwen ksosnowski
(posted 2023-03-24 03:04:01.0) Hello Shouwen, thanks for reaching out to Thorlabs. For questions like this you can contact techsupport@thorlabs.com directly. The output from a PMT is negative and can be offset using our PMT Software control window. The maximum voltage output in conjunction with the offset is +/- 1.5V. Setting the offset close to negative 1.5V risks clipping data. To avoid saturation, the output signal should not exceed the maximum output voltage. This will adjust the actual voltages coming out of the PMT's transimpedance amplifier (TIA). You can use other software to further adjust the offset from the data you receive. Generally using a more positive offset will increase the dynamic range of the TIA due to the negative PMT output. I have reached out directly to discuss your application further. user
(posted 2023-01-06 03:04:47.1) We have bought a PMM01 from your company for taking CH chemiluminescence data from combustion experiments. I am unsure on how to set up the PMT,
a) setting up the power supply, the first time I connected the main power supply to the power supply (12V) adapter you had provided the adapter burnt. We bought the PMT to use in India, does it have anything to do with the normal power supply ratings of 230V in India?
b) I would also like to know how to use the Y cable, one line of the Y cable is connected to the power supply adapter, the other I'm not sure how to use. Do I have to connect it to a variable power source? If so I have a DAQ wherein I can use the LabVIEW software to supply the necessary variable voltages to the PMT, is this right?
c) I'm not sure how to use the variable power source, please enlighten me on how to use or what settings I have to use approximately to get data of CH Chemiluminescence which emits light at 430nm. ksosnowski
(posted 2023-01-18 03:37:35.0) Thanks for reaching out to Thorlabs. The LDS12B power supply that comes with the PMM01 has a selector to switch between 115V and 230V regions. By default this is set to 115V so will need to be switched here. The Y cable is used to apply the HV Control Voltage, and can be connected to a voltage source of user choice. We do not sell a specific supply for this as there are many benchtop variable voltage sources available from other providers. If your DAQ can output voltages then it could be used for this. A source with low voltage ripple is recommended, as any noise on this control voltage will directly effect the high voltage across the PMT tube, and hence the tube gain. I have reached out directly to discuss your application further. Shulang Lin
(posted 2022-12-22 19:18:42.8) we have purchase several PMT2101 to detect TPF signal, while we found that the output voltage is always negative and only 70-100mV. May I know whether there is any setting could let the output be same as +-1.5V as the description? ksosnowski
(posted 2022-12-28 05:09:02.0) Thanks for reaching out to Thorlabs. The DC offset, Bandwidth, and Control Voltage can all be set through our PMT Software. The PMT2101 manual covers the software install on pages 9-23. Page 26 shows how to change the DC offset. The Control Voltage will effect the PMT Gain, which will scale the output voltage swing resulting from your signal amplitude above background level. It is recommended to keep the output voltage below the +1.5V Max as this will saturate the amplifier. Page 7 also has the equation for output voltage based on optical power and gain settings. I have reached out directly to discuss your application further. Sean Su
(posted 2022-08-26 16:05:07.477) I tried to use the LabView sample file named "PMT2100Test.vi" in the SDK to Link the PMT, but the Find Devices function keeps responding with Device Counter = 0. I confirm that the Driver is installed and your application works, but it still doesn't work on my LabView program. Is there any solution? cdolbashian
(posted 2022-09-07 03:58:30.0) Thank you for reaching out to us. The most important thing when using our LabView samples is to keep all of the dependent files within the same relative path to the Vi. I have contacted you directly to troubleshoot your exact issue. minhui liang
(posted 2022-07-07 01:32:38.183) Hi, I wonder how to calculate the relative fluorescence unit by this PMT? RFU = U/(G^a), where U is the output voltage and G is the gain. But the exponent a should be provided by the manufacturer. I wonder where can I find this value. Thank you! cdolbashian
(posted 2022-07-19 11:38:16.0) Thank you for reaching out to us Minhui. After reading the reference to which you found this equation, it seems like the author was referring to G with a unit of Volts, which seems to imply a control voltage and thus the exponent seems to be the exponential relationship between the control voltage and the gain value, as shown similarly our gain curves. It is unclear though if this is exactly the interpretation, as the author of the referenced paper was very brief. Xindong Song
(posted 2022-05-17 17:23:46.607) Question about the GaAsP PMT: PMT2201(2). The "Specs" tab shows the anode current is 500 µA (Max). This is far beyond the value of Hamamatsu H10771-40 or any of the H7422 series, which typically has an anode output current of 2 µA (Max), with the exceptions of the very latest models (H16200(1)P-40) that have a 40 µA (Max), Is this 500 µA (Max) true? or maybe due to different ways of defining the anode current? or a typo? I assume this PMT is based on the Hamamatsu H10771. Thanks. cdolbashian
(posted 2022-05-27 12:30:45.0) Thank you for reaching out to us with this inquiry. We do indeed use the H10771-40, as stated in our manual. We use a modified version that trips at 50 µA in the PMT2100 as an average current over ~100us. Since the response time of a 2P laser happens on the order of only 10 ns , the average current still falls within the specified amount. The trip only comes into play for sustained high photon flux usage. Impulses can be significantly higher. 500 µA before the amplifier is allowed (anode current). But it must be of short duration, i.e. a few 2P laser cycles while scanning past a bright cell body. I have reached out with you to discuss this further in context of your application. user
(posted 2021-11-30 22:12:35.27) We have a 32-bit system and want to control this PMT with our own developed program. Is it possible? I see the disk has an installation of NI-VISA and Keysight IO, does it mean the control is based on VISA? Can you provide me the command reference to control the PMT with our own program? Thanks!
Cheers
Tao cdolbashian
(posted 2021-12-23 02:03:44.0) Thank you for reaching out to us Tao! Serial commands are included in the manual for the device. Regarding an SDK, I have contacted you directly with some example code and documentation for use with your PMT. Byeongjun Seok
(posted 2021-10-02 21:25:47.91) We are using PMM01 together with power supply and connectors. After several years, the 6-pin Hirose to 3-pin Lumberg connector is broken, so I was wondering you carry this part separately. Thanks. YLohia
(posted 2021-10-15 11:48:23.0) Thank you for contacting Thorlabs. Custom and component items can be requested by emailing techsales@thorlabs.com. We will reach out directly. Will Jou
(posted 2020-11-10 10:28:04.86) Dear Sir, I'd like to purchase a PMT. After comparing different products, however, it seems that APD performs better than PMT. For example, the APD410A2 typical max
responsivity is 25 A/W at 600nm and M=50 while PMT2101 radiant sensitivity is only 176 mA/W at 550nm. What's more, the APD410A2 max conversion gain is 12.5 x 10^6 V/W while PMT2101 gain is only 1 x 10^6 V/W. I prefer PMT than APD, but can you tell me PMT advantages compared to APD, after all PMT's price is more than APD. Looking forward to your reply and thank you in advance. asundararaj
(posted 2020-12-29 03:15:23.0) Thank you for contacting Thorlabs. The choice of the PMT vs. APD comes down to the specifications and your preference. A lot of imaging applications, for example, prefer a PMT over an APD. In addition to the specifications you compared, the noise floor in the PMT is going to be much less. The PMT2101 has a higher bandwidth - 80 MHz (at low signal) vs 10 MHz for the APD410A2. The active area for the PMT is larger - 5 mm vs. 0.5 mm for the APD. I have contacted you directly to discuss your needs. Mark Hui
(posted 2020-02-27 05:02:46.033) We are applying PMT1001 for our fluorescence measurement. According to PMT1000 Series User Guide, the PMT Gain is linearly proportional to Control Voltage in Figure 3. How is Control Voltage related with GAIN in Program PMT2100? Also, what is the PMT Gain in Figure 3? What is the relationship between the PMT Gain and GAIN in the program?
Thanks,
Mark llamb
(posted 2020-02-28 10:45:17.0) Hello Mark, thank you for contacting Thorlabs. For future reference, you may email us at techsupport@thorlabs.com directly for application support and spec questions. You can find the same Gain vs. Control Voltage plot for the PMT2100 series in their respective manuals, as well as under the "Graphs" tab on this webpage. In the software, the user can set the Control Voltage (see Figure 38 in the PMT2101's manual) which corresponds to the Gain as per the same plots mentioned above. Mark Hui
(posted 2020-02-27 02:28:14.913) Dear Sir,
We are applying Labview 2014(32bits) to control PMT1001. We attempt to open the Labview programs in SDK. But we cannot open the Labview programs, because the Labview programs cannot link with the dynamic library. Could you please help?
Thanks,
Mark llamb
(posted 2020-02-28 10:36:07.0) Hello Mark, our PMT software is only compatible with 64-bit Windows® 7 or 10 systems. I would suggest switching to a 64-bit system if possible, and do apologize for any inconvenience this may cause. Mark Hui
(posted 2019-09-24 19:25:31.61) Dear Sir,
We plan to apply the PMT1001 to measure the periodic modulation of fluorescence signal. So, the PMT 1001 signal is fed into a lock-in amplifier to measure the AC component.
According to the manual (Page 9), the maximum output of PMT1001 is +-1.5V. I tune the DC offset and check the PMT output voltage, when the PMT is kept in dark.
DC Offset = 1V, Output Voltage =2.21V
DC Offset = 0V, Output Voltage =0.014V
DC Offset = -1V, Output Voltage =-2.19V
Which DC Offset should we apply to PMT1001 for our experiment? How can we set the DC offset for PMT1001?
Thanks,
Mark nbayconich
(posted 2019-10-25 03:21:22.0) Thank you for contacting Thorlabs. We suggest to keep the maximum output voltage between -1.5 & +1.5volts otherwise the transimpedance amplifier will saturate.
If the voltage is too high please adjust the DC offset until the output voltage is at a suitable level or attenuate your input signal using a neutral density filter.
Note that the output voltage of this PMT is a negative voltage. The offset voltage setting will depend entirely on your application requirement, in the case where you may be reading the output of your PMT to a DAQ instrument that can only accept a positive voltage range then you may need to apply a higher + DC offset to the PMT in order to read the signal on your DAQ card. trose
(posted 2018-10-06 10:15:32.54) We are having a lot of issues with PMT tripping of our PMT2100. As far as I understand this is due to the adjustable secondary amp trip circuit - not the 50uA primary trip threshold of the PMT.
Would it be possible that you expose the VOLTage[:DC]:PROTection commands (Appendix A) in a future version of the PMT control software? It would be extremely helpful for us to fine-tune trip levels, switch off the protection etc.
I am aware that this is a safety feature that is potentially dangerous - I also know that we can set these values ourselves using the Keysight IO libraries. It would be more convenient to have this in your software, though.
Also: What is the Voltage Level you currently use for the PMT2100 trip circuit? As far as I can see there is no way to read this out currently. Across which range would you suggest to change these values?
Tobias Rose llamb
(posted 2018-10-23 08:29:44.0) Hello Tobias, thank you for your feedback. Generally, the trip circuit prevents the PMT from overexposure, so we do not recommend removing it, nor is it removable from the PMT2100 series specifically because of their compact size.
For the PMT2100, we factory-set the secondary trip circuit to the max level and have commented out the code on the firmware that allows adjustment, so these are not adjustable nor able to be increased. This secondary circuit could in principle allow you to adjust the trip level below the primary 50 uA trip level, but this primary trip level is actually the limiting factor for the PMT. Our secondary amplifier circuit does not limit the trip level.
We could potentially quote these same PMTs without the trip circuit as custom products, though they would need to be new purchases. I will reach out to you directly to discuss further. htu
(posted 2018-10-05 11:20:56.813) PMT2101 is similar to Hamamatsu H7422-40, with an notable exception that the cooling fan is absent, so that the PMT is more compact. My question is: has Thorlabs done comprehensive test to justify that this cooling fan is not needed (even for long-term operation)? YLohia
(posted 2018-10-17 12:30:38.0) Hello, thank you for contacting Thorlabs. The PMT2101 is actually equivalent to Hamamatsu H10770PA-40, which does not have active cooling either. The requirement of the cooling fan/TEC depends on your specific application and is not a universal necessity. For applications that do not require superior long-term stability and extremely high sensitivity, the PMT2101 is probably sufficient. jos.castelein
(posted 2018-05-01 15:55:33.387) Can you please provide me help with the installation of the PMT1001 drivers for Labview.
Regards, Jos Castelein YLohia
(posted 2018-05-01 12:07:02.0) Hello Jos, I will reach out to you directly to troubleshoot your issues. kuw4214
(posted 2017-08-07 20:24:11.97) Dear Sir/Madam
This is Ui-Whan,Kim in South Korea
I Bought five set of PMTSS and TIA60 for measurement of OH signal.
But today I figure out that I dont have proper power.
Please let me know the proper power model number for each products that I bought
.
Then I will buy immediately for my experiment.
Please contact by an email.
Thank you very much. tfrisch
(posted 2017-09-05 04:29:59.0) Hello, thank you for contacting Thorlabs. PMTSS requires a power supply with 15VDC which limits the supply current to no more than 7mA. I will reach out to you directly since we do not offer such a power supply in our catalog at this time. pwyen
(posted 2016-12-08 10:47:44.503) Hi, this is PW from Taiwan.
I can't fine the figure of the control gain voltage with the PMM01 control gain. Could you kindly send me that figure? Thank you. tfrisch
(posted 2016-12-15 01:22:31.0) Hello, thank you for contacting Thorlabs. Please reference page 5 of the manual here:
https://www.thorlabs.com/drawings/1de4aa08f64cd423-1D709DCD-5056-0103-792BFB6CE1C63899/PMM01-Manual.pdf lleclair
(posted 2016-08-05 06:35:37.237) It would be very useful to me if I could do single photon counting/timing. But with a rise time of 15 µs that's out of questions. Do you offer one without the amplifier so I can attach my own high speed amp for time-of-flight measurements? What is the rise time straight out of the PMT? devin.pugh-thomas
(posted 2015-09-15 15:31:52.85) Can you provide a recommended variable power supply for use with the PMM02? besembeson
(posted 2015-10-01 11:45:57.0) Response from Bweh at Thorlabs USA: Any basic adjustable power supply will work, 0 - 1.25VDc, <1mA. Many common laboratory variable power supplies will work too. You can also make one, by using, for example another LDS1212 (power supply that is supplied with PM tube), add suitable potentiometer and resistor in series (between +12V and ground) to scale the voltage down to 0-2V and limit current to 1mA. ribou
(posted 2015-04-14 14:42:50.4) I could not found on your description of the pmm01 the time rise of the anode, neither the electron transit time.
I would be grateful if you could send the information to me.
Thanks jlow
(posted 2015-04-16 02:58:43.0) Response from Jeremy at Thorlabs: The response time for the PMM01 and PMM02 PMT are limited by the amplifier used. The rise and fall time is about 15µs, which is orders of magnitude higher than the anode rise time and electron transit time. I will contact you directly to discuss more about this. johanna.tragardh
(posted 2015-02-12 17:19:39.533) What length should the 2.5 mm Mono plug controlling the HV for the PMT PMM01 have?
If it is not a standard length - do you sell this as a spare part?
Thanks. cdaly
(posted 2015-02-24 03:58:54.0) Response from Chris at Thorlabs: The required 2.5mm mono plug will be a standard length, 11.0mm overall if I am not mistaken. A spare male 2.5mm mono connector is included so that a third part power supply can easily be made compatible. iec_cortesm
(posted 2013-05-07 19:42:31.093) one year ago I bought a PMT PMM02, unfortunately my +/-12V power supply doesn't work anymore... I try to use a conventional power supply and plug this in the Hirose-3 conector in the interface conector wire, in this conector there are labeled 3 and 1 two pines, can you tell me which pin is for each voltaje? jlow
(posted 2013-08-02 15:58:00.0) Response from Jeremy at Thorlabs: Pin 1 should be for +12V and pin 3 should be for -12V. The other pin is ground. jlow
(posted 2012-07-31 14:30:00.0) A response from Jeremy at Thorlabs: Most basic adjustable source will work fine. The 100uA mentioned in the manual is just the input current spec for the device. Basically the supply required needs to be able to supply 100uA of current. This is more of a control line than a supply line. This voltage is used to set the level of the tube bias voltage. The reason the supply is specified this way is so that a potentiometer can be used to control this signal line. You want to choose your potentiometer resistances so that the 100uA load current does not significantly affect the voltage setting. The current through the pot. should be 10x or more larger than the 100uA. Below is an example.
Ex. - Use a resistor and potentiometer in series between the +12V PMM001 supply and the ground. The wiper would be connected to the control line. The resistor is used to scale the range of the control pot over 0 – 2V. If we set the resistor to 10kOhms and the pot to 2kOhms (12kOhm total resistance) the current will be 12V/12kOhms or 1mA. This is much larger than the 100uA input current so there should be a minimal effect on the input voltage due to the resistive network.
Other supplies that can be used are lab bench top adjustable power supplies, computer controlled DAQ cards, etc. jb693
(posted 2012-07-26 10:14:24.0) I have recently purchased the PMM02 photon multiplier tube. What power supply would you recommend I purchase for the 0-1.8V tube
control voltage? tcohen
(posted 2012-06-13 12:04:00.0) Response from Tim at Thorlabs: Thank you for your feedback. These may be dark counts, but I would like to see your scope shots to further troubleshoot. I have contacted you for more information and to continue this conversation. wpar022
(posted 2012-06-13 01:33:56.0) Hi there,
We have been using a PMM01 and notice with on all power supplies we use with it there is a strong pulse signal at ~200Hz. Increasing PMT gain merely inverts signal around the background level. Increasing gain/optical input power results in pulse signal changing to a semi-sawtooth signal. Observed signal is independant of input signal - input pulses will not result in a corresponding output pulse. Mean signal level is ~10 mV for 50 Ohm termination, and 1-2 V for high impedance. We suspect that our power supplies (all TLabs supplied, with other equiptment, running on 230V) may be damaging the PMT, but are unable to rule out other laboratory sources. Gain control voltage does not exceed 1.4 V. Any insight you may be able to provide would be greatly appreciated! bdada
(posted 2012-01-19 16:05:00.0) Response from Buki at Thorlabs:
Thank you for your feedback and we are sorry it took a while for you to get the PMT working. We will look into improving the instructions in our manual. We did test the PMT and found it to respond to ambient light. When we shone a high power LED against the pinhole in the black tape, the PMT responsed. We have contacted you to discuss this matter further.Please contact TechSupport@thorlabs.com if you have any questions. ji-yi
(posted 2012-01-19 09:59:41.0) Dear Thorlabs, we would like to make a comment on the product (pmm02) and the manual. As in my last post, we had problems on making the PMT work. It turned out the polarity of the gain control voltage should be reversed and now it is working fine. We strongly recommend the manual description and the usage tutorial to be revised. What is very confusing is that in the manual it states that the control voltage is a positive value 0-1.8v. And the cable inputting the control voltage is colored red and black. According to conventional usage of the cable color without specific notation, the black is ground and the red is positive. So what we have tried is always put a positive voltage through the red cable, which should have been the other way around to make it work. We spent a great deal of time on figuring out the problem and I am sure we will not be the last to be confused. Please be more specific on the manual description or on the website especially on how to correctly connect the gain control voltage and I strongly recommend to switch the color of the cable for gain control voltage. Thank you! ji-yi
(posted 2012-01-17 10:31:44.0) Dear Thorlabs, we recently purchased PMM02 and have difficulty to make it work. We used a DC power supply for the 0-1.8V gain control and a oscilloscope to monitor the voltage output(connected with a coaxes cable). The PMT inlet was sealed with a black tape with a tiny pinhole on it. We were not able to see any voltage change when we swept a flash light over the pinhole. When we increased the gain voltage to 0.6v, there is a constant DC voltage increment. But still no response to the light stimuli. Please advise how to trouble shoot. This is actually the second PMT we tested. The same problem persists. Thank you! bdada
(posted 2011-12-26 09:30:00.0) Response from Buki at Thorlabs:
The +/-12VDC power supply is included in the PMM02 photomultiplier module. If you want to purchase extra power supplies, the part number is LDS1212-1 and they can be purchased by calling or emailing our Sales Office at 973 300 3000 or sales@thorlabs.com. We do not sell the variable power supply, but they are available in electronics stores.
Please contact TechSupport@thorlabs.com if you have any questions. lobanov
(posted 2011-12-23 10:14:58.0) Please send a quote and delivery conditions for
1) power supply +-12V for photomultiplier module PMM02
2)Variable 0-18 VDC power supply for photomultiplier module PMM02 jjurado
(posted 2011-06-23 10:55:00.0) Response from Javier at Thorlabs to jsmarkson: Thank you very much for contacting us. We will contact you directly to troubleshoot your application. jsmarkson
(posted 2011-06-17 02:15:02.0) We have purchased two PMM01 modules recently and have experienced sudden, dramatic loss of sensitivity after a few months of use. We use the modules to detect bioluminescence emitted from cells passing through a transparent glass tube. The system is very well insulated from outside light, and we adjust the initial gain (~1000V) so that readings never max out(usually they are in the 0V to 4 V range). However, after several months use, the signal suddenly drops > 100-fold, and increasing the gain to 1500V improves the signal only a few fold at best.
I have heard that PMTs should have lifetimes on the scale of many years even under harsh conditions, but we are experiencing a lifetime of at most a few months in mild conditions (a warm room at 30C @ 40% relative humidity; system is powered on continuously for 1 week and then left off for 1-4 weeks). We once took apart the module and tried replacing the PMT tube itself with a similar one from a third-party supplier. This improved sensitivity for a very short while (weeks?) before we again experienced a 100-fold drop in signal.
Do you know what could be causing this reliability problem and how to fix it? The reliability problem has ruined several experiments already, and we are considering switching to the much more expensive modules from Hamamatsu. We would strongly prefer to stick with ThorLabs if you can help us trace the problem and fix it. jjurado
(posted 2011-02-14 18:03:00.0) Response from Javier at Thorlabs to last poster: Thank you very much for submitting your inquiry. The output from our photomultiplier tubes does not require the use of specialized software for data collection and analysis. You could use a data acquisition card and a program such as LabVIEW in order to analyze the output. Please contact us at techsupport@thorlabs.com if you have any further questions. user
(posted 2011-02-14 14:13:39.0) Do you have any recommendations for software to analyze the PMTs output? Thanks. apalmentieri
(posted 2010-03-03 08:36:28.0) A response from Adam at Thorlabs to mbvincent: There are tubes available that cover the wavelengths that you are interested in. We could offer these as custom options. We do not normally offer complete modules for these tubes for a couple of reasons. Please note there are problems associated with operation of a complete system in the vacuum UV range. Either the complete detector has to be in the vacuum system or the input window of the detector has to form part of the vacuum containment system. These modules are not designed for use under vacuum are likely to outgas and breakdown. The reason outgassing and breakdown may occur is due to the electronics used. UV tubes can be operated in pulse counting mode including photon counting. The electronics required would be an amplifier discriminator and a simple timer counter. apalmentieri
(posted 2010-02-19 15:39:10.0) A response from Adam at Thorlabs to Melsscal: Currently, we only offer a PMT with a 15us rise time. We may be able to offer this version as a custom option, but we would like to get more information about your application. There may be other devices that would also work like our avalanche photo detectors, APD110A. melsscal
(posted 2010-02-19 03:33:42.0) We are looking for a rise time of at least 50ns whereas the PMM01/PMM02 offers only 15 microseconds.Can we get a custom made part with 50ns rise time ? mbvincent
(posted 2009-12-14 13:18:47.0) Dear Thor Labs,
Do you offer a PMT module that covers 115-320 nm (wider range welcome) with a minimum 13 mm diameter active area? What associated electronics are required to operate the PMT in pulse counting mode?
The application is FUV calibration of mirrors and microchannel plate detectors. The PMT will be located within a vacuum chamber (<10-6 Torr).
Regards,
-Mark B. Vincent
Staff Research Associate IV
Dept. of Applied Science
3001 Engineering III
University of California
One Shields Ave
Davis, CA. 95616-8254
Phone: (530) 752-3747
E-mail: mbvincent@ucdavis.edu klee
(posted 2009-12-08 17:50:36.0) A response from Ken at Thorlabs to moweirong: The max current is very small (<1mA), so the power supply does not need much current capability. I would recommend using a linear supply. Almost any bench top supply that is adjustable from 0 to at least 1.8V will work. Something like this will work just fine: http://www.powersupplydepot.com/productview.asp?product=14600+PS moweirong
(posted 2009-12-08 00:20:32.0) Could you please advise what requirements for the user-provided 1.8V control voltage? how much is the max input current, the ripple noise, and the stability? any recommendations of this control voltage unit? thanks klee
(posted 2009-12-07 18:20:55.0) A response from Ken at Thorlabs to moweirong: A 12VDC power supply is included with the PMM02. moweirong
(posted 2009-12-07 17:47:09.0) Same question as melsscal.
Does Thorlab provide power supply unit for hirose cable to connect the PMM02? Tyler
(posted 2009-01-26 13:46:00.0) A response from Tyler at Thorlabs to melsscal: The PMT modules are 120 and 230 V compatible. I updated clarified this point in the web presentation. I also changed the specs tab table to have the weight of the power supply and the weight of the PMT head listed separately. The cable needed to connect the power supply to the PMT head is included with the purchase of the PMT. If you have any further questions, please post them and thank you for helping us improve the clarity of the web presentation. melsscal
(posted 2009-01-26 06:34:28.0) The ordering part no. PMM01-EC(230v ) version is not shwon on website .is it available on ordering ?WHAT DOES ITS MEANS BY WEIGHT OF MODULE & TOTAL WEIGHT ?Similarly there is no part no. as PMM02-EC displayed on website.Do u have a pwoer supply /cable for the 6 pin hirose connector ? |
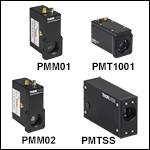
| Standalone PMTs Selection Guidea | |||||||
|---|---|---|---|---|---|---|---|
| Item # | PMM01 | PMM02 | PMTSS | PMT1001(/M) | PMT1002 | PMT2101(/M) | PMT2102 |
| Photo (Click to Enlarge) |
 |
 |
 |
 |
 |
 |
 |
| Photocathode Material | Bialkali | Multialkali | Multialkali | Multialkali | GaAsP | ||
| Wavelength Range | 280 - 630 nm | 300 - 800 nm | 185 - 900 nm | 230 - 920 nm | 300 - 720 nm | ||
| Peak Wavelength (λp) | 400 nm | 420 nm | 450 nm | 630 nm | 580 nm | ||
| Radiant Sensitivityb (Typical) | 80 mA/W (at λp) | 51 mA/W (at λp) | 105 mA/W (at λp) | 78 mA/W (at λp) | 176 mA/W (at 550 nm) | ||
| PMT Gain (Max) | 7.1 x 10⁶ | 5.1 x 10⁵ | >1.0 x 10⁷ | >3.0 x 10⁶ | >1.0 x 10⁶ | ||
| Photocathode Active Area | Ø22 mm | Ø21 mm | 3.7 mm x 13.0 mm (H x V) |
Ø8 mm | Ø5 mm | ||
| Transimpedance Amplifier |  |
 |
Not Included (Compatible with TIA60) |
 |
 |
 |
 |
| Mechanical Features | Internal SM1 Threads Three 8-32 Taps for Posts (8-32 to M4 Adapter Included) Four 4-40 Taps for 30 mm Cage System |
Internal C-Mount Threads | Internal SM1 Threads 1/4"-20 (M6) Tap for Posts Four 4-40 Taps for 30 mm Cage System |
Internal C-Mount Threads | Internal SM1 Threads 1/4"-20 (M6) Tap for Posts Four 4-40 Taps for 30 mm Cage System |
Internal C-Mount Threads | |
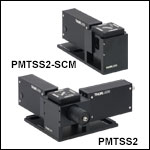
| Multi-Channel PMTs Selection Guidea | |||||||
|---|---|---|---|---|---|---|---|
| Item # | PMTSS2 | PMTSS2-SCM | |||||
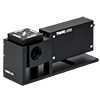
| Photo (Click to Enlarge) |  |
 |
|||||
| Number of Channels | 2 | 1 | |||||
| Photocathode Material | Multialkali | ||||||
| Wavelength Range | 185 - 900 nm | ||||||
| Peak Wavelength (λp) | 450 nm | ||||||
| Radiant Sensitivity at λpb |
105 mA/W | ||||||
| PMT Gain (Max) | >1.0 × 10⁷ | ||||||
| Photocathode Active Area | 3.7 mm × 13.0 mm (H × V) |
||||||
| Transimpedance Amplifier | Not Included (Compatible with TIA60) |
||||||
| Mechanical Features | SMA905 Fiber Coupler Internal SM1 Threads (by Disconnecting Fiber Coupler) 1/4" (M6) Counterbored Slots for Table Mounting Interlocking Dovetails Optically Align Additional Channels |
||||||

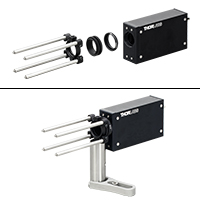
Click to Enlarge
To mount the PMTSS module to a post, 30 mm cage system, or SM1 lens tubes, many of our 30 mm cage plates can be used together with the SM1A9 C-Mount to SM1 Thread Adapter and SM1T2 Lens Tube Coupler.
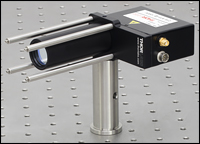
Click to Enlarge
The PMM01 and PMM02 modules include three 8-32 tapped holes for post mounting, four 4-40 taps for our 30 mm cage system, and internal SM1 threads for mounting lens tubes and filters.

Click for Details
A pair of dovetail adapters can be used to create quick connections between a PMT and a lens-tube-based optical assembly.
- PMM01: Amplified PMT for 280 - 630 nm with Voltage Output, SM1 Threads, and 30 mm Cage Compatibility
- PMM02: Amplified PMT for 300 - 800 nm with Voltage Output, SM1 Threads, and 30 mm Cage Compatibility
- PMT1001(/M): Amplified PMT for 230 - 920 nm with Voltage Output, SM1 Threads, and 30 mm Cage Compatibility
- PMT1002: Amplified PMT for 230 - 920 nm with Voltage Output and
C-Mount Threads - PMTSS: PMT for 185 - 900 nm with Current Output and C-Mount Threads
Thorlabs' standalone alkali PMTs are offered in four package styles. Each package provides different types of output signals and mechanical mounting features. The Graphs tab contains a plot comparing the radiant sensitivity of each PMT; the radiant sensitivity is closely related to the quantum efficiency. Complete specifications are available in the Specs tab above.
These PMTs feature internal SM1 or C-mount threads, granting them compatibiltiy with our dovetail adapters for 30 mm cage system and SM1 lens tube (sold below). Please contact Tech Support if you wish to integrate these PMTs with existing Thorlabs confocal and multiphoton systems.
PMM01 and PMM02
The PMM01 and PMM02 modules have an active area of Ø22 mm and Ø21 mm, respectively. Their built-in transimpedance amplifiers allow them to directly provide output voltage signals through an SMA connector. The control voltage that biases the PMT is provided through a 2.5 mm mono jack. A variable voltage source that can provide up to +1.8 V (PMM01) or up to +1.25 V (PMM02) will be needed for bias control. Each module ships with a 2.5 mm mono plug that can be wired by the user to an appropriate low-noise voltage source.
The photocathode is located behind internal SM1 threads. These threads can be used to connect the PMT to SM1 lens tubes, which are useful for reducing scatter into the photocathode from unwanted sources or mounting Ø1" neutral density or bandpass filters. Direct filter mounting is not recommended because the filter will be in contact with the window. In addition, four 4-40 taps for Thorlabs' 30 mm cage system are provided. Three sides of the housing have an 8-32 tapped hole for Ø1/2" and Ø1" post mounting. An 8-32 to M4 thread adapter (Item # AS4M8E) is included for metric setups.
A ±12 V power supply with a region-specific power cord is included with these PMTs. Replacement power supplies are sold below.
PMT1001(/M) and PMT1002
The photocathodes of these PMTs have an active area of Ø8 mm. Their built-in transimpedance amplifiers allow them to directly provide output voltage signals through an SMA connector. The PMTs are powered and controlled through a USB 2.0 mini port, which is required to supply 4.5 to 5.5 VDC at 350 mA typical current. A USB 2.0 type A to mini adapter cable is included to connect the PMT to the computer. Each PMT may be controlled by a computer running the software available from the Software tab, which supports the Windows® 7 and 10 (64-bit) operating systems.
These PMTs are offered in two package styles, providing a range of mechanical mounting options. The PMT1001(/M) features internal SM1 threads, which can be used to connect the PMT to SM1 lens tubes. In addition, the PMT1001(/M) features four 4-40 taps to mount the PMT onto a 30 mm cage system as well as a 1/4"-20 (M6) tapped hole for post mounting, such as with our ∅1" posts. The PMT1002 features internal C-Mount threads, which can be used to connect the PMT to C-Mount extension tubes.
PMTSS
This PMT module has an active area of 3.7 mm × 13.0 mm (H × V). It provides an output current through a BNC connector. Unlike the PMM01 and PMM02 modules, it has no transimpedance amplifier; Thorlabs' TIA60 Transimpedance Amplifier is available separately. The control voltage that biases the PMT is provided through a female M8 x 1 connector. A variable voltage source that can provide up to +1.20 V will be needed for bias control (see the Graphs tab for details). Each module ships with a male M8 x 1 connector with leads that can be wired by the user to an appropriate low-noise voltage source.
The photocathode is located behind internal C-Mount threads. These threads can be used to connect the PMT to C-Mount extension tubes, which are useful for reducing scatter into the photocathode from unwanted sources or mounting Ø1" neutral density or bandpass filters. The threads on the PMT module are not deep enough to directly accommodate a filter with a retaining ring.
No power supply is included with this PMT. The leads on the included male M8 x 1 connector can be wired to a +15 VDC source with a 7 mA current limit. See the Pin Diagrams and Shipping List tabs for details.

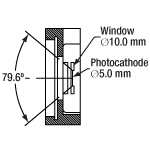
Click to Enlarge
PMT2100 Series Collection Angle
- 300 - 720 nm Spectral Range
- Transimpedance Amplifier Provides Voltage Output
- PMT2101(/M): SM1 Threads, 30 mm Cage Compatible, and 1/4"-20 (M6) Tap for Post Mounting
- PMT2102: C-Mount Threads
To detect low-intensity signals in fluorescence experiments, Thorlabs offers GaAsP PMT modules with an active area of Ø5 mm. The GaAsP photocathode provides a high quantum efficiency in the visible spectrum, resulting in an elevated sensitivity to incoming illumination versus photocathodes composed of alkali metals (see the Overview for a graph of the radiant sensitivity, which is proportional to the quantum efficiency). In addition, these PMT modules utilize a wide collection angle, further enhancing light detection (see the image to the right). Note that, if exposed to high intensity incident light, sensitivity degradation is more likely to occur compared to alkali PMTs.
These PMTs feature a built-in transimpedance amplifier, providing an output voltage through an SMA connector. They are powered and controlled through a USB 2.0 mini port, which is required to supply 4.5 to 5.5 VDC at 350 mA typical current. A USB 2.0 type A to mini adapter cable is included to connect the PMT to the computer. Each PMT may be controlled by a computer running the software available from the Software tab, which supports the Windows® 7 and 10 (64-bit) operating systems.
These PMTs are offered in two package styles, providing a range of mechanical mounting options. The PMT2101(/M) features internal SM1 threads, which can be used to connect the PMT to SM1 lens tubes. In addition, the PMT2101(/M) features four 4-40 taps to mount the PMT onto a 30 mm cage system as well as a 1/4"-20 (M6) tapped hole for post mounting, such as with our ∅1" posts. The PMT2102 features internal C-Mount threads, which can be used to connect the PMT to C-Mount extension tubes.
Thorlabs offers dovetail adapters that can be used to integrate a C-mount- or SM1-threaded PMT into optical assemblies based on our 30 mm cage or SM1 lens tube system. Please contact Tech Support if you wish to integrate these PMTs with existing Thorlabs confocal and multiphoton systems.

Click to Enlarge
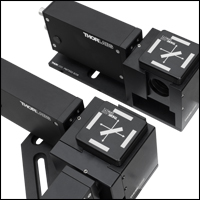
Interlocking Dovetails for Easy Connection of Additional Channels
Click to Enlarge
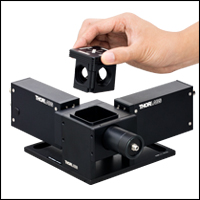
Removable Filter Cube Top for Holding Dichroic Mirrors and Bandpass Filters
- PMTSS2: Dual-Channel PMT Module with Exchangeable Fluorescence Filter
Cube Insert - PMTSS2-SCM: Add-On Single-Channel PMT Module with Dovetail for Mechanical and Optical Alignment
- Compatible with SMA905 Fiber-Coupled and Free-Space Optical Inputs
- Additional Filter Cube Inserts Available Separately
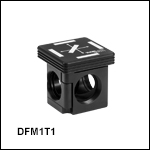
The PMTSS2 Dual-Channel Module and PMTSS2-SCM Add-On Module are designed to help ease detection of signals across multiple spectral channels. The PMTSS2 module incorporates two PMTs (Item # PMTSS, detailed above) and a DFM1T1 Filter Cube Top. This filter cube top can hold one 25 mm x 36 mm dichroic mirror and a Ø25 mm bandpass filter in front of each photocathode, thereby selecting the wavelengths that the PMTs will detect, and it includes a magnetic retention mechanism for easy exchange. The PMTSS2-SCM module is a single-channel add-on for the PMTSS2, which incorporates one PMT and an additional DFM1T1 filter cube top.
The input port of the PMTSS2 module has a fiber collimation assembly with an SMA905 connector, which accepts signals that have been coupled into a multimode fiber patch cable or bundle. A Ø910 µm core, 0.22 NA, SMA905-terminated patch cable for 250 - 1200 nm (bare fiber item # FG910UEC) is included with the module. If desired, the collimation assembly can be unthreaded to allow the module to accept free-space signals. Unthreading this assembly exposes internal SM1 threads that are compatible with our Ø1" lens tubes. The PMTSS2-SCM add-on module does not include a fiber collimation assembly, but it is compatible with the one included with the PMTSS2.
To allow a PMTSS2-SCM module to be added to an existing PMTSS2 setup, the modules' housings include interlocking dovetails that provide mechanical and optical alignment. The installation procedure is illustrated in the animation to the right and requires a 5/64" (2 mm) balldriver or hex key. If using the included fiber input, a maximum of eight channels is recommended in order to prevent beam divergence from causing inefficient signal detection. If using a free-space signal, note that each photocathode's active area is 3.7 mm × 13.0 mm (H × V).
Each PMT provides an output current through a BNC connector. No transimpedance amplifiers are included; Thorlabs' TIA60 Transimpedance Amplifiers are available separately. Each PMT requires a separate control voltage, which is provided through a female M8 x 1 connector. A variable voltage source that can provide up to +1.20 V will be needed for bias control (see the Graphs tab for details). The PMTSS2 module ships with two male M8 x 1 connectors with leads that can be wired by the user to an appropriate low-noise voltage source; the PMTSS2-SCM add-on module ships with one connector.
Each module includes 1/4" (M6) counterbored slots for mounting to an optical table or workstation. Due to the weight of these modules, we only recommend direct table mounting. The PMT can be detached from the rest of the module by loosening a setscrew with a 5/64" (2 mm) balldriver or hex key.
No power supplies are included with these PMT modules. The leads on the included male M8 x 1 connectors can be wired to +15 VDC sources with 7 mA current limits. See the Pin Diagrams and Shipping List tabs for details.

- Replacement Power Supply for the PMM01 and PMM02 Modules
- ±12 VDC Power Output
- 2 m (6.6') Cable with LUMBERG RSMV3 Male Connector
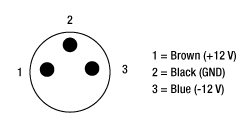
The LDS12B power supply provides a regulated ±12 VDC output for use with our PMM01 and PMM02 modules. It includes an on/off switch with an LED indicator and accepts 100 VAC, 120 VAC, or 230 VAC input voltage, selectable by a switch. As shown in the diagram to the right, the 2 m (6.6') long cord has three pins: one for ground, one for +12 V and one for -12 V. A region-specific power cord is shipped with the unit. This power supply can also be used with the PDA amplified photodetectors, PDB balanced photodetectors, APD avalanche photodetectors, and the FSAC autocorrelator for femtosecond lasers.
 Products Home


 Click to Enlarge


 Zoom
Zoom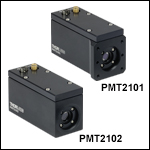

 Photomultiplier Modules (PMTs)